Navigating the client profile
Each client has two workspaces: the profile Dashboard — where day-to-day clinical work happens — and the Edit Client page for their details, billing setup, contacts, and portal access.
In this guide, we'll cover:
- Working from the Dashboard
- Editing client details
- Profile tab
- Payment & Insurance tab
- Contacts tab
- Portal tab
Working from the Dashboard
Click a client's name anywhere (Clients list, calendar, a note) to open their profile:
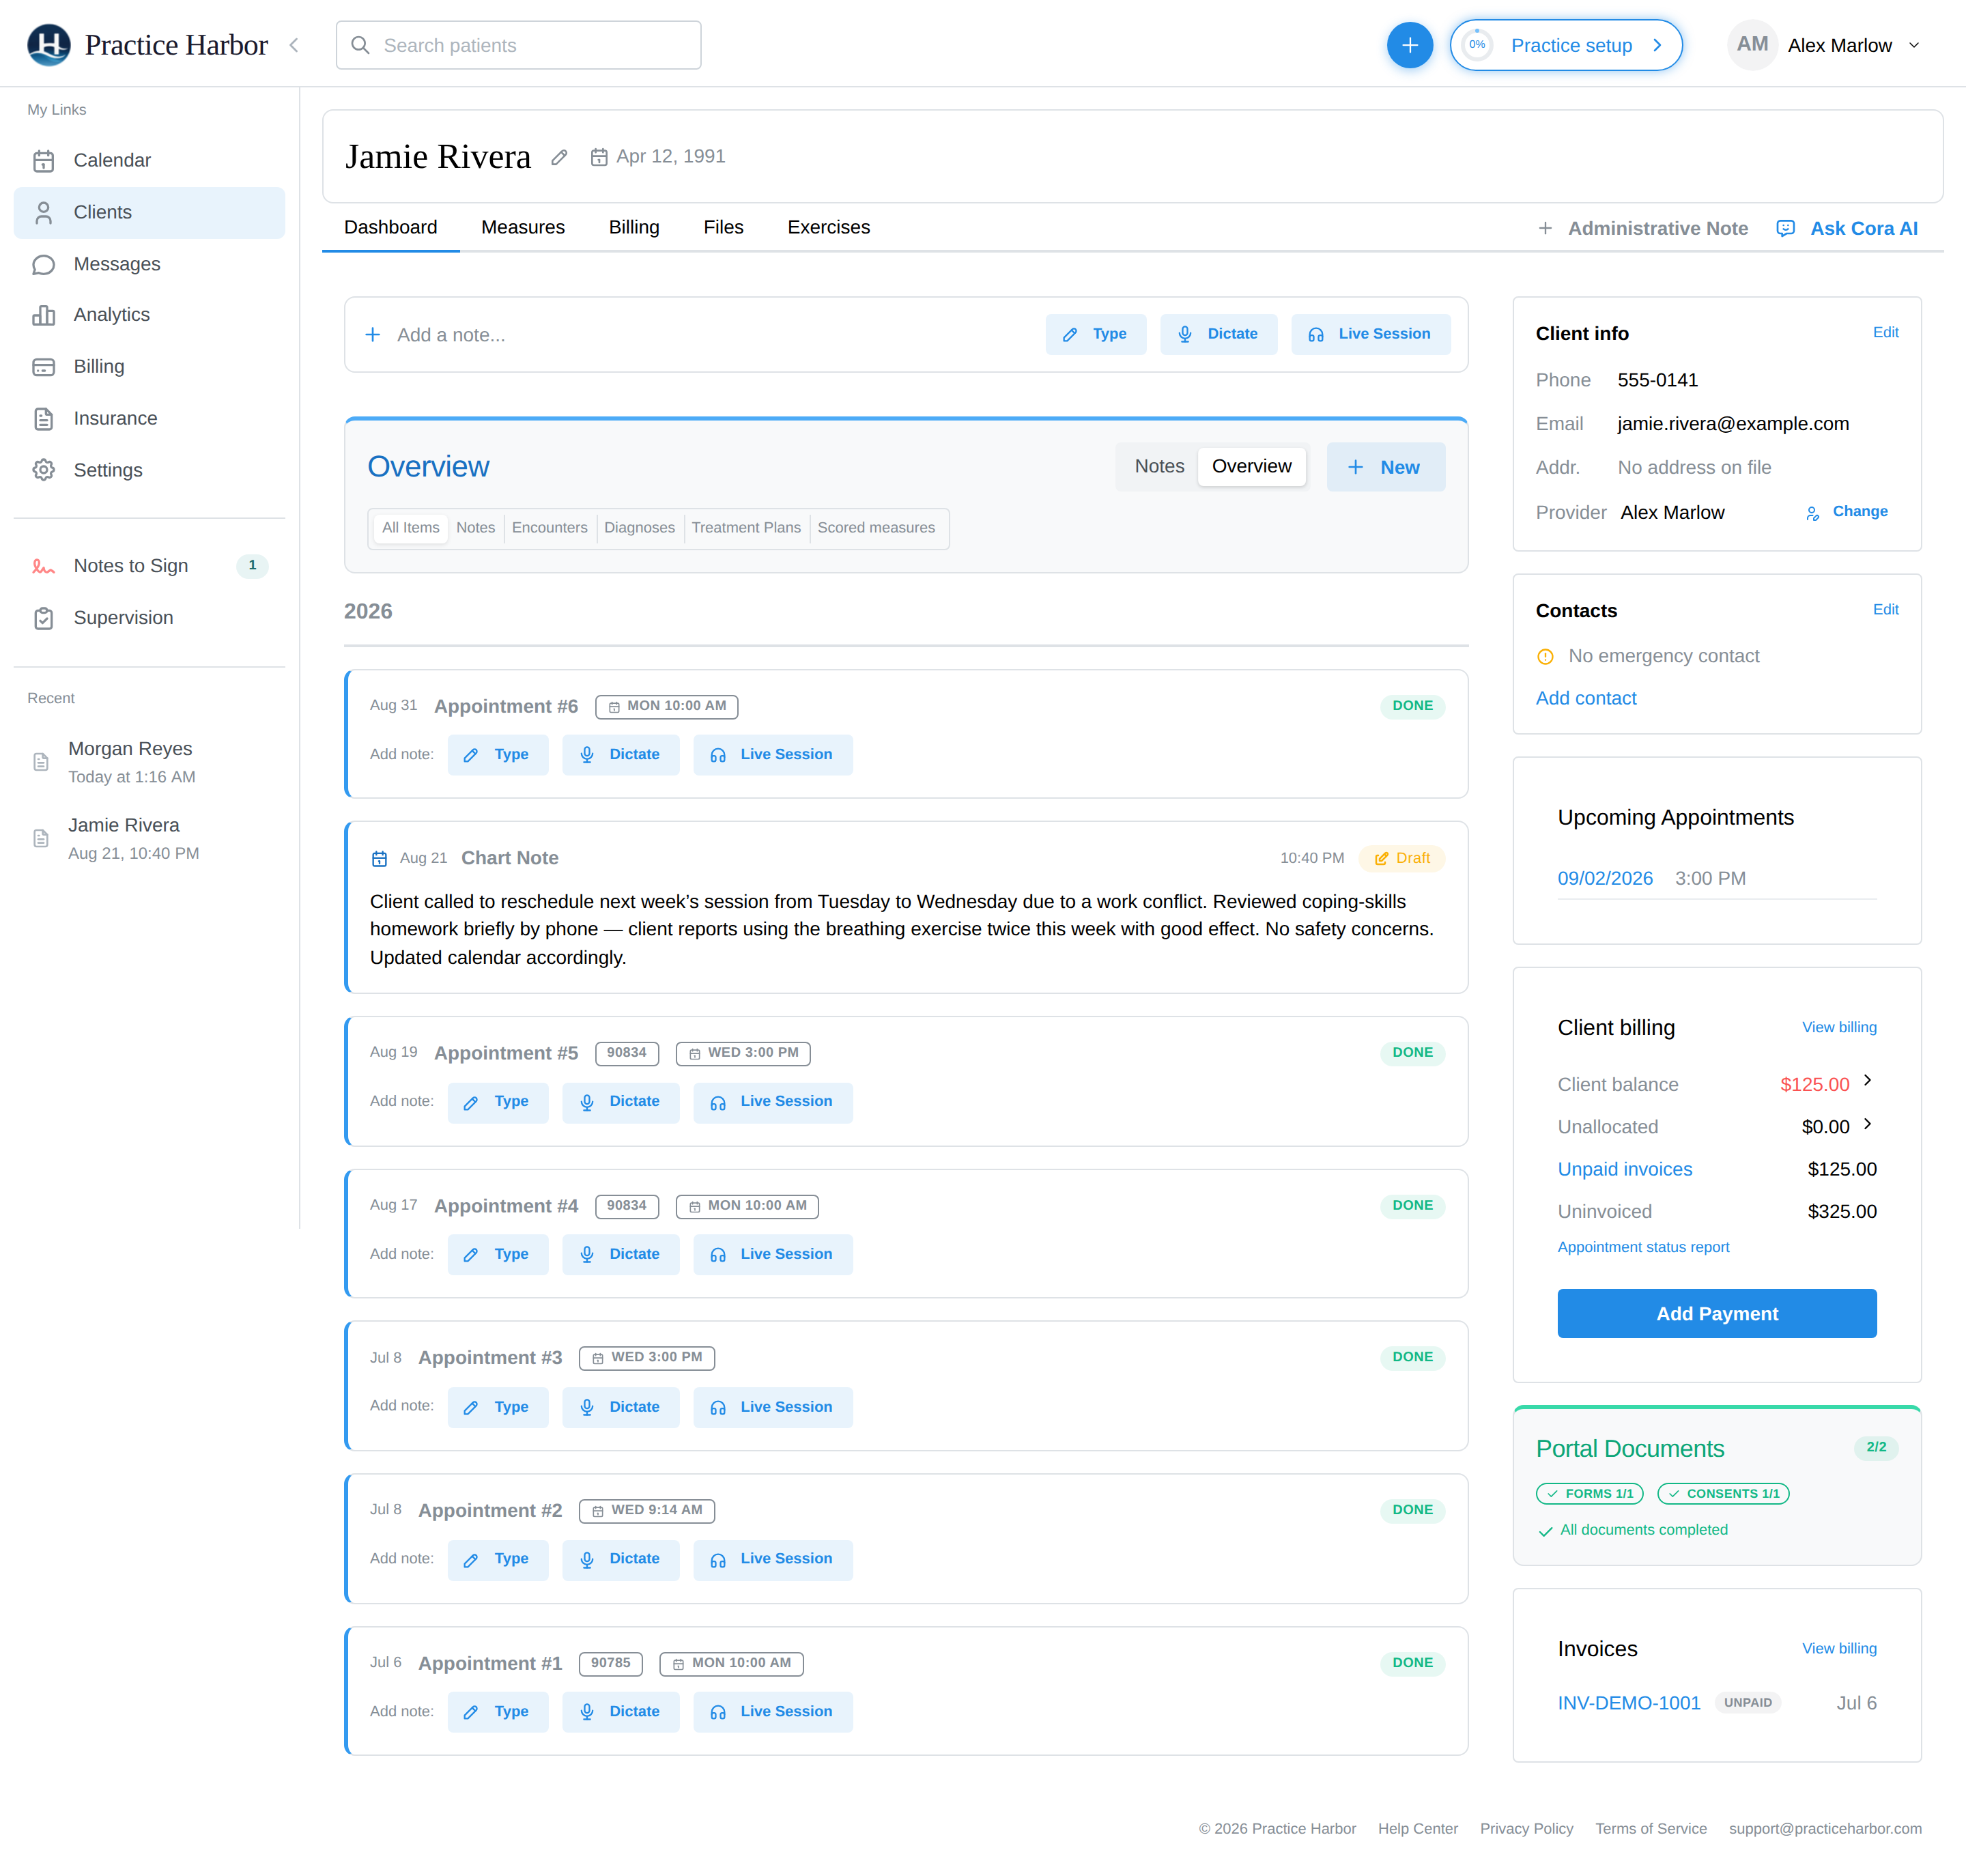
- Start documentation right from the top: the note bar offers Type (write now), Dictate, and Live Session (record for AI notes). In the Type editor, a Format picker lets you stay with the free-form Chart Note or pick one of your templates — "Templates open the full note editor with sections ready to fill in." The Clinical Notes list below opens in Notes (every note, newest first). Switch to Overview for the whole chart in date order — sessions with their notes, diagnoses, treatment plans, and completed measures; the view you pick sticks on that device.
- The New menu above the notes starts bigger workflows: Diagnosis and Treatment Plan, Good Faith Estimate, Send Intake, and Share Documents.
- The sidebar cards keep the rest one click away: Client info (with the Edit link), Contacts, Upcoming Appointments, Client billing, Insurance (when insurance is enabled), Couples & Family (the client's therapy groups), intake status, and treatment-plan review reminders ("Plan review due").
- Tabs across the top switch to Measures (scored measures over time), Billing (when billing is enabled for your practice), Files — the Files tab shows a badge when documents are waiting — and Exercises (practice exercises assigned to the client).
To reassign whose caseload the client belongs to, use Change next to the Provider line in the Client info card — that one saves immediately.
Editing client details
Open the client's profile and click Edit on the Client info card. The Edit Client page has four tabs — Profile, Payment & Insurance, Contacts, and Portal. Profile and Payment & Insurance collect changes and save with their own Save button (an orange dot on the tab marks unsaved changes); Contacts and Portal act immediately. If you leave with unsaved changes, you'll be asked to Stay on Page or Leave Without Saving.
Profile tab
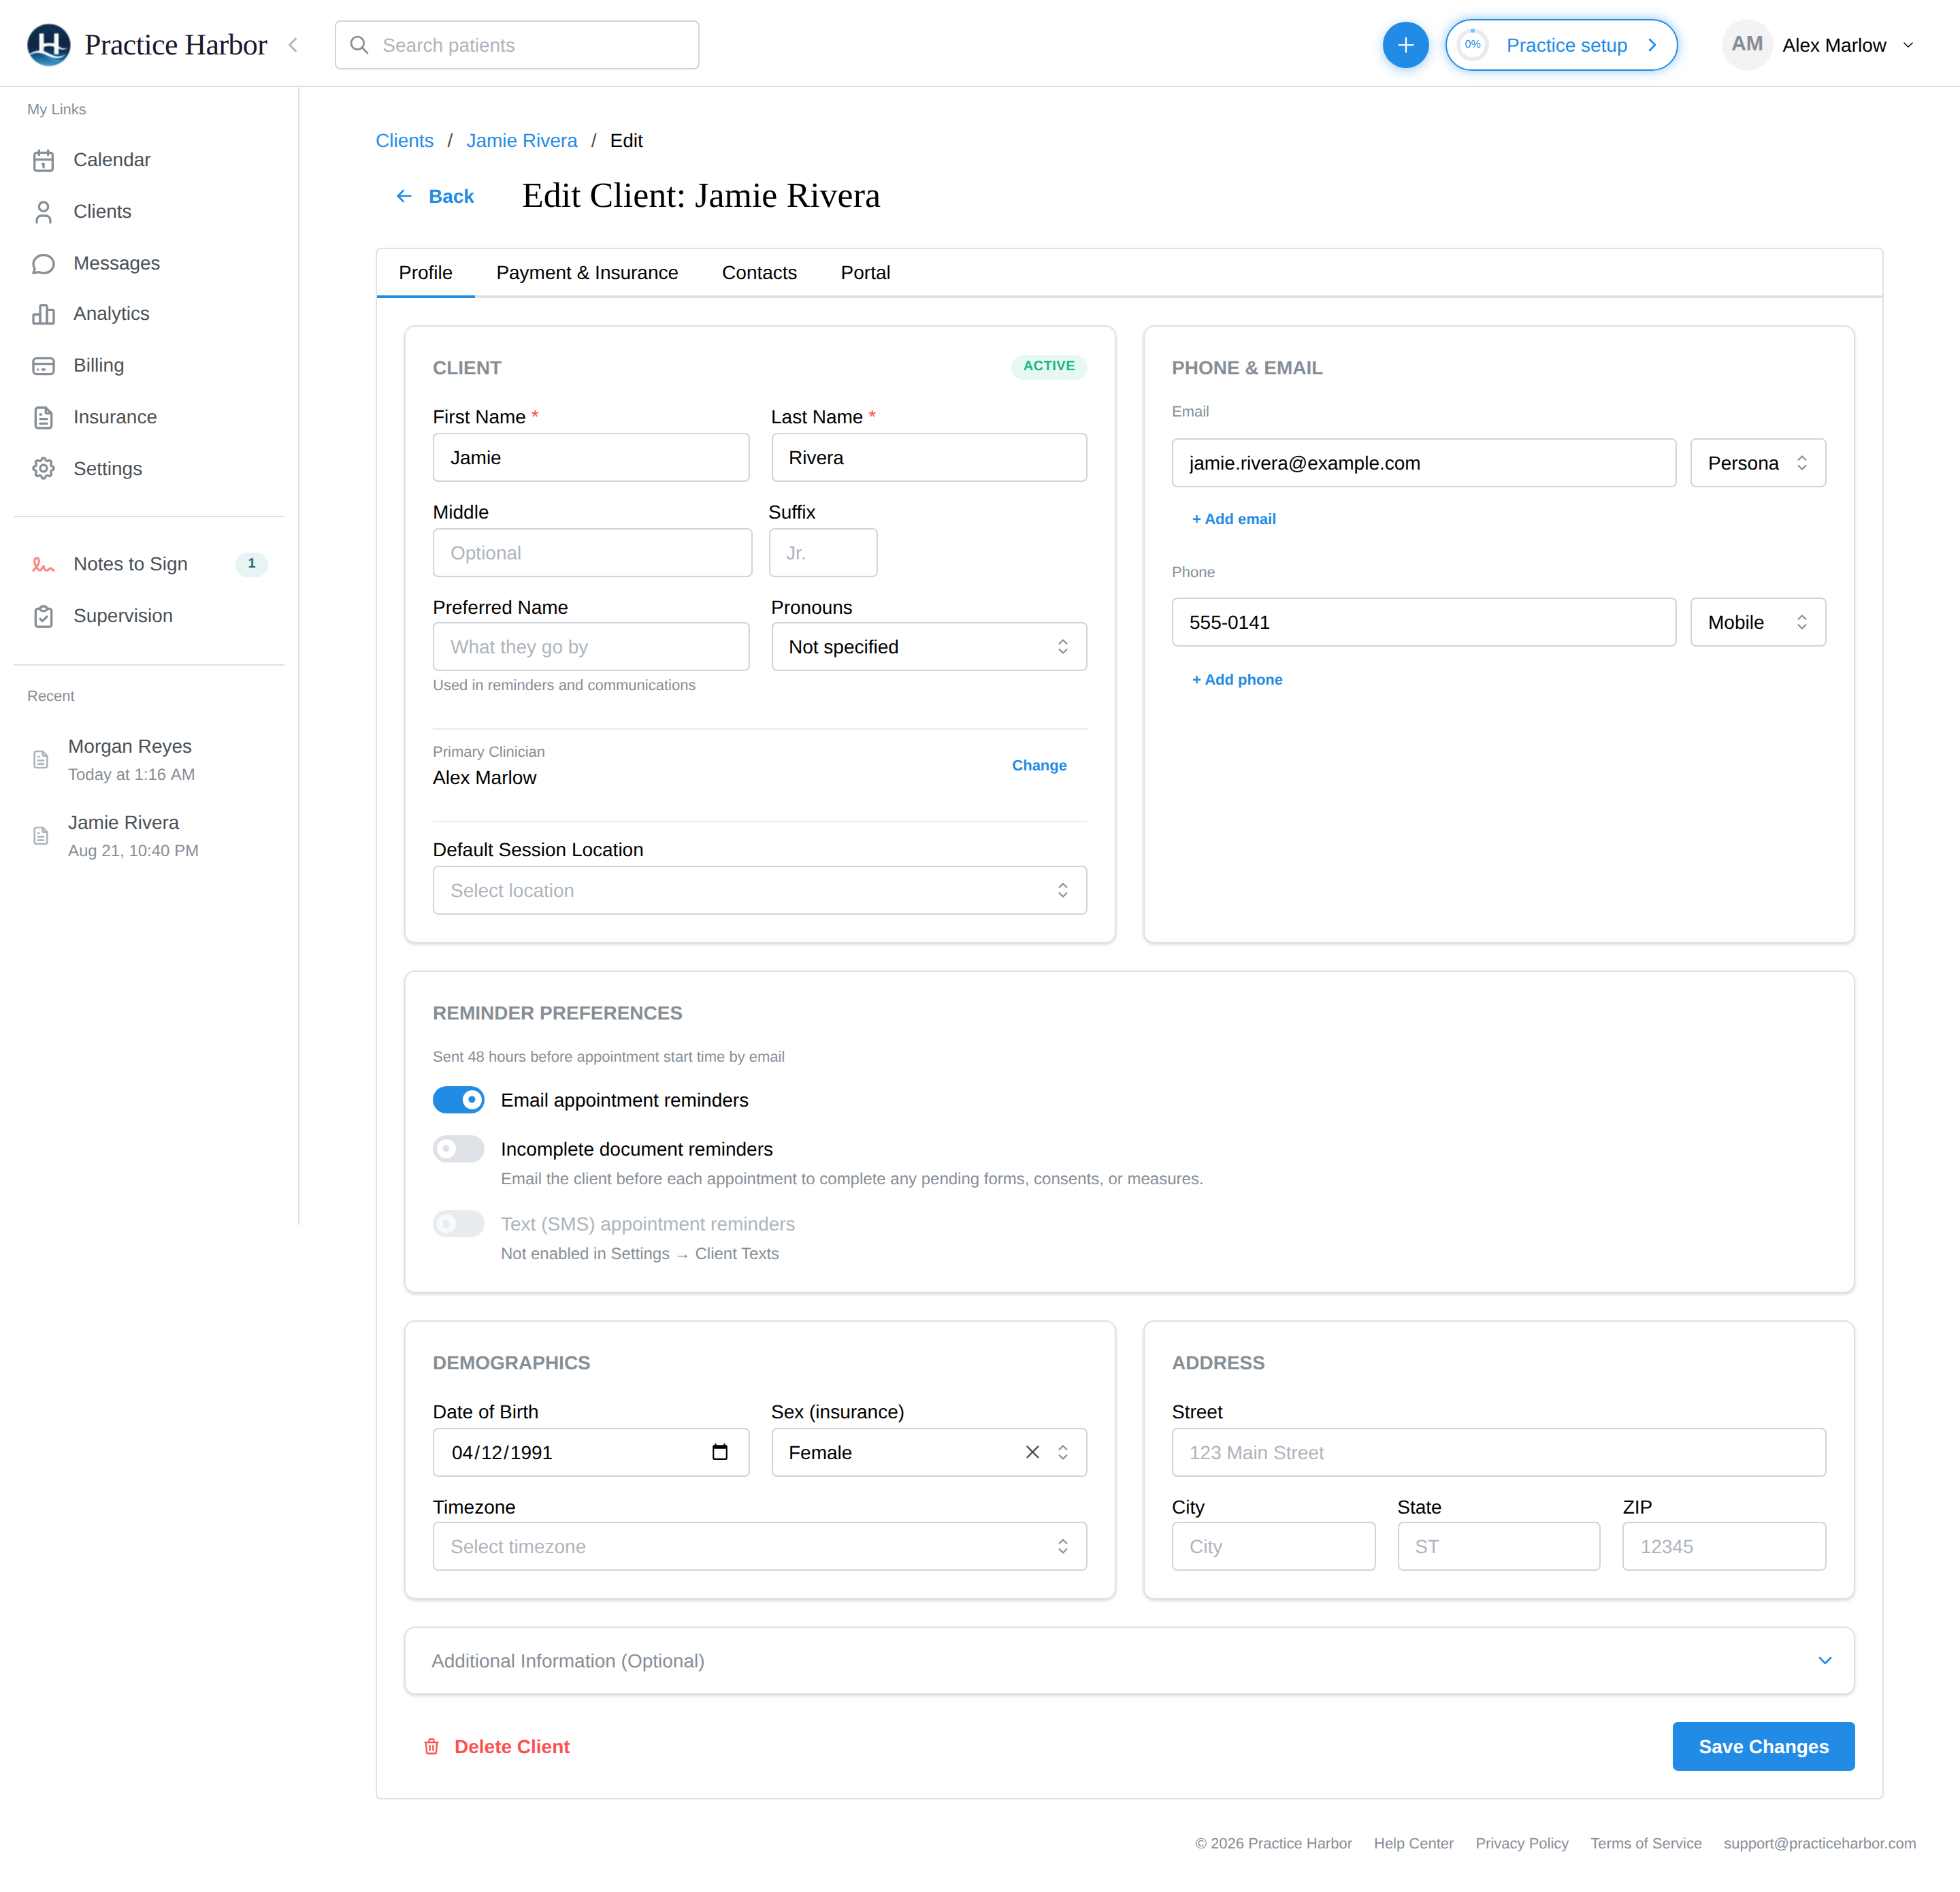
Client status
The Active / Inactive badge at the top of the card is clickable — click it to deactivate (or reactivate) the client, then Save Changes. Inactive clients keep their full record but leave your active lists, and their portal sign-in is disabled automatically.
Name
| Field | Description |
|---|---|
| First Name | Client's legal first name (required) |
| Middle Name | Middle name or initial |
| Last Name | Client's legal last name (required) |
| Suffix | Name suffix (e.g., Jr., III) |
| Preferred Name | "What they go by" — stored separately from the legal name and used in reminders and communications |
Phone & email
Add as many as needed with + Add email / + Add phone, each typed (Personal/Work for email; Mobile/Home/Work for phone). With two or more emails, the Reminder Preferences card lets you pick which address gets appointment reminders.
Demographics
| Field | Options |
|---|---|
| Date of Birth | Date picker (flags the client as a minor when under 18) |
| Sex (insurance) | Male, Female, Other, Prefer not to say |
| Pronouns | He/Him, She/Her, They/Them, Other |
| Timezone | Eastern, Central, Mountain, Pacific, Alaska, Hawaii |
Expand Additional Information (Optional) for relationship status, employment status, and race/ethnicity (standard OMB categories). The Address card holds street, city, state, ZIP.
Primary clinician and default location
- Primary Clinician — Change/Assign opens the provider picker; the assignment saves with the tab's Save Changes. This drives whose My Clients list the client appears on.
- Default Session Location — preselected on new appointments for this client.
Deleting a client
Delete Client (bottom of the Profile tab) only works for clients with no history — if any appointments, notes, invoices, or claims exist, deletion is refused ("This client has history and can't be deleted") and the right move is the Inactive status instead: records are preserved, the client leaves your active list. This protection is deliberate — a clinical record should outlive a cleanup impulse.
Payment & Insurance tab
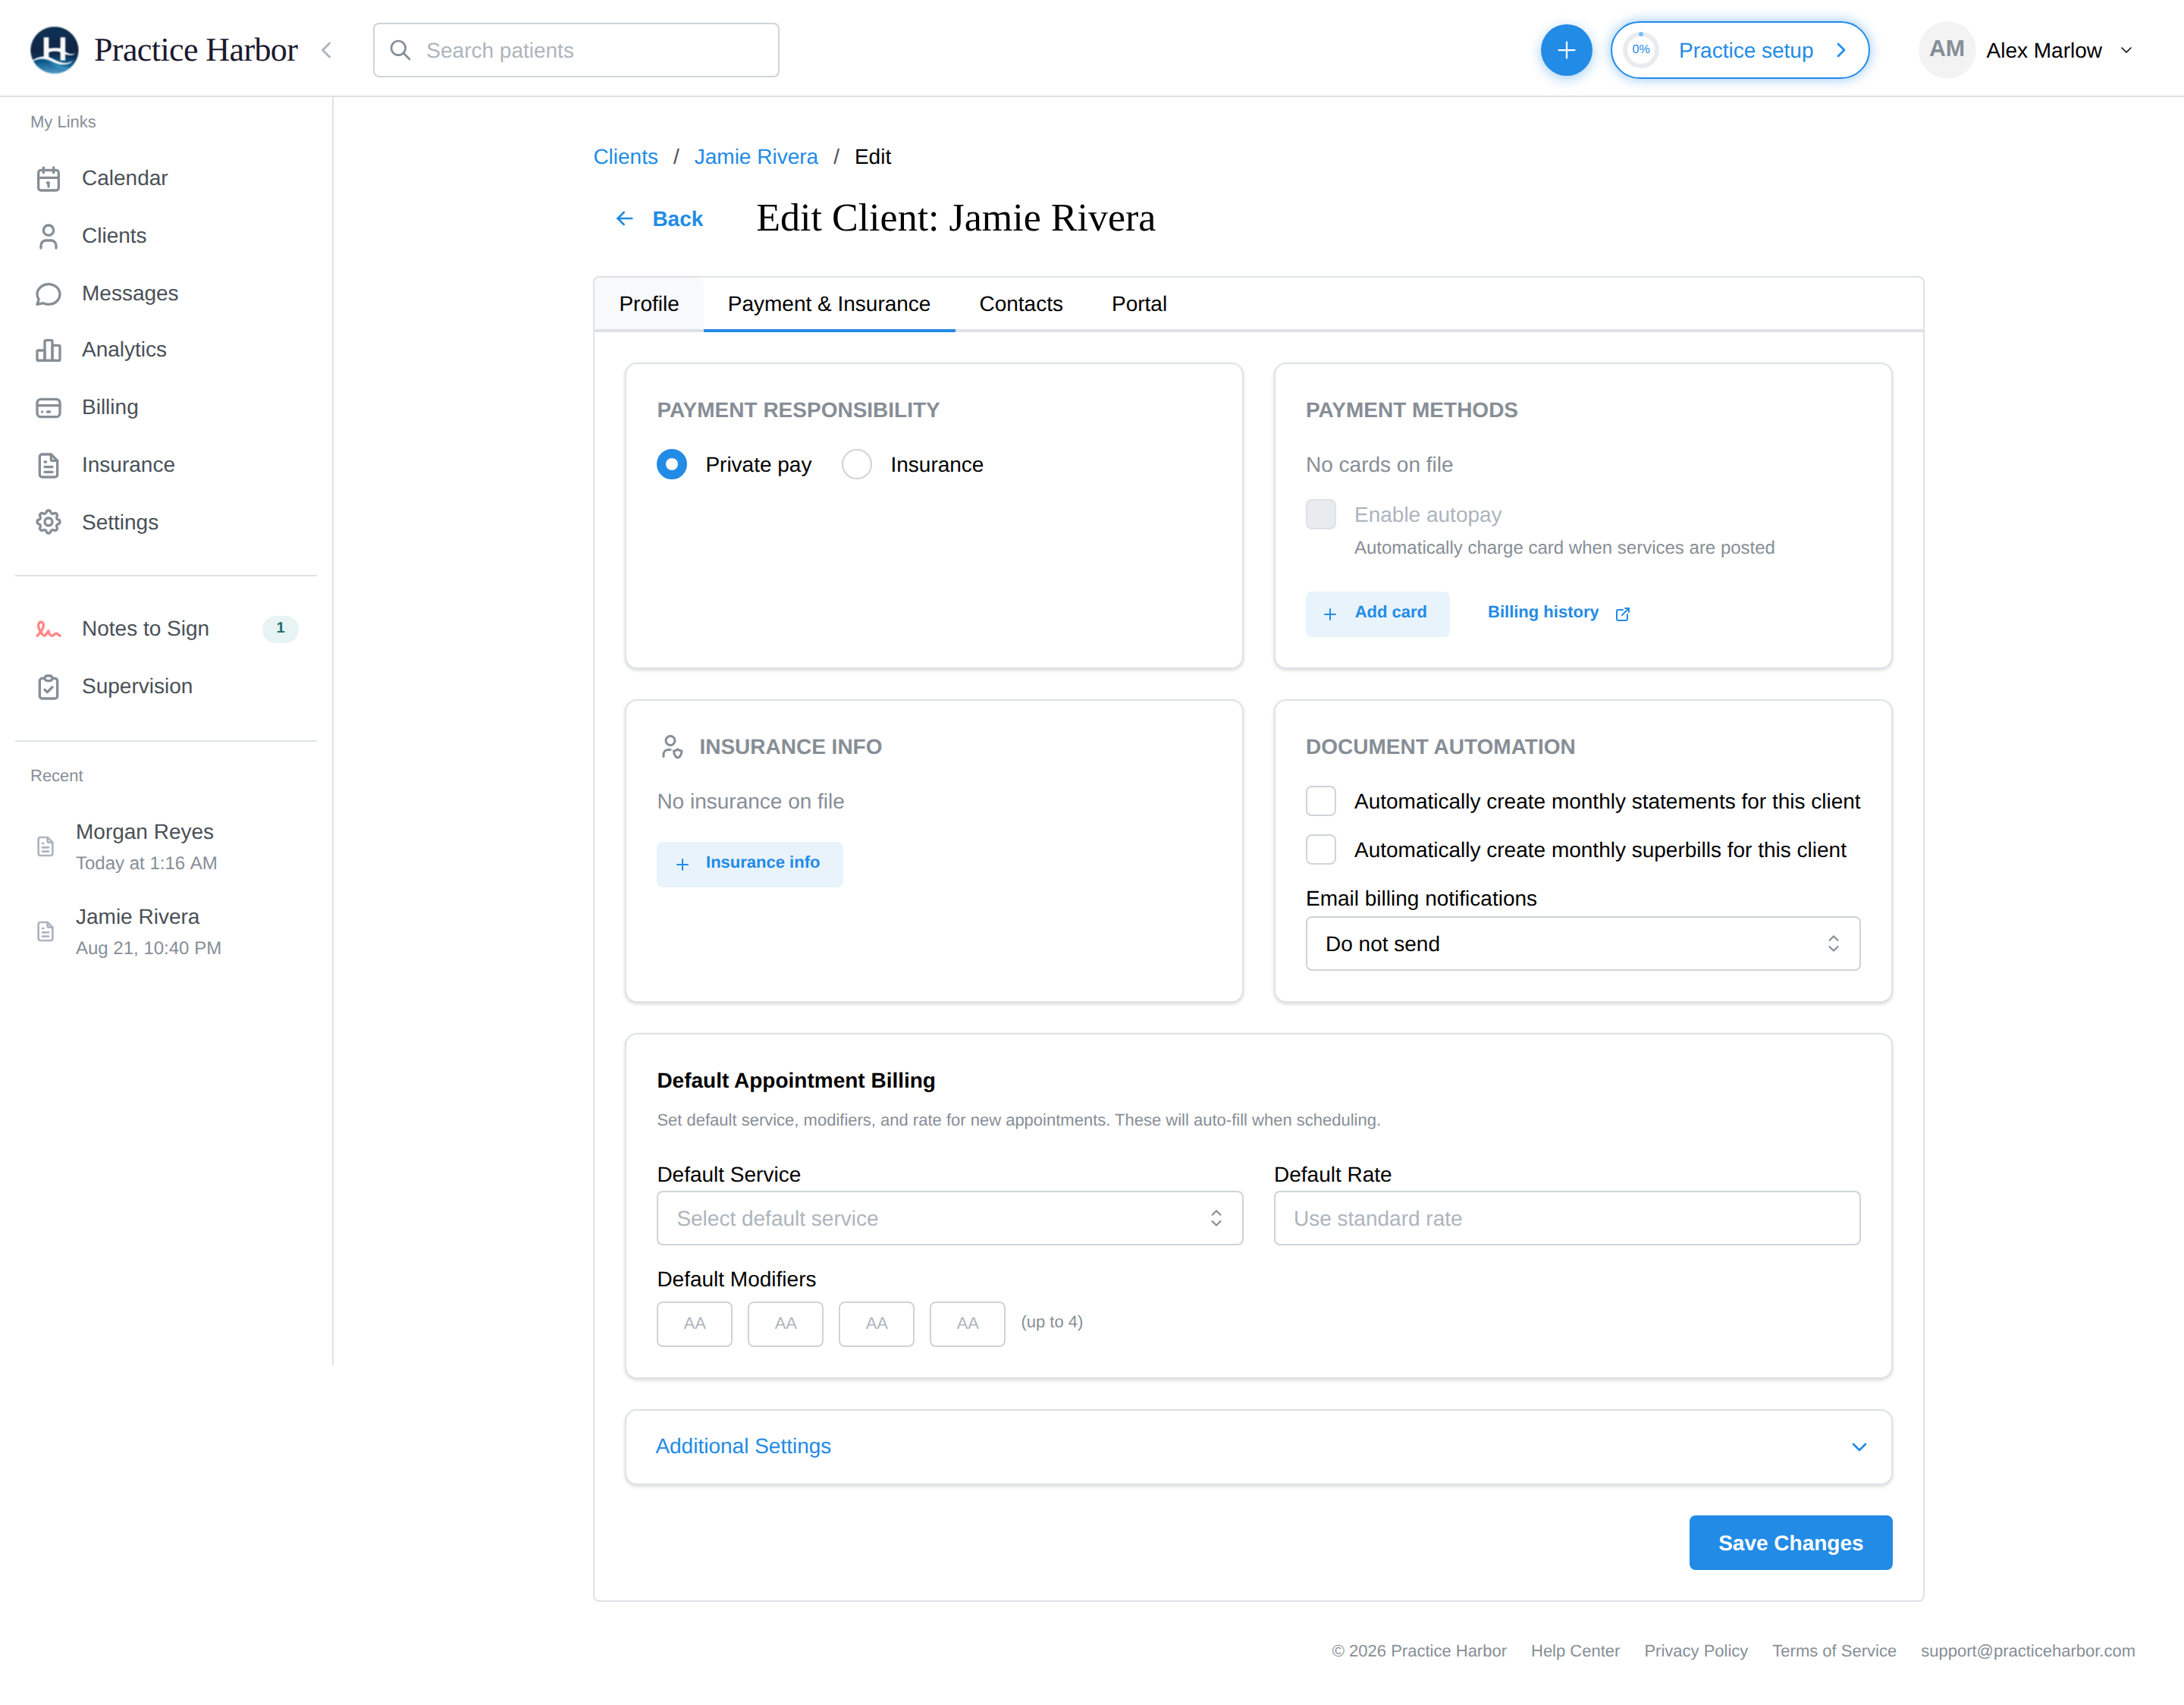
- Payment Responsibility — Private pay or Insurance; this decides whether appointments generate plain invoices or flow into insurance billing.
- Payment Methods — cards on file via Stripe (full numbers never touch Practice Harbor). Add a card, label it ("HSA card"), set a default, and optionally Enable autopay to charge automatically after each appointment — see AutoPay.
- Insurance info — the client's coverage details; see Client coverage.
- Document Automation — auto-generate monthly statements/superbills and email billing documents to the client.
- Default Appointment Billing — a per-client default service, modifiers, and rate that auto-fill when scheduling: "Set default service, modifiers, and rate for new appointments."
Contacts tab
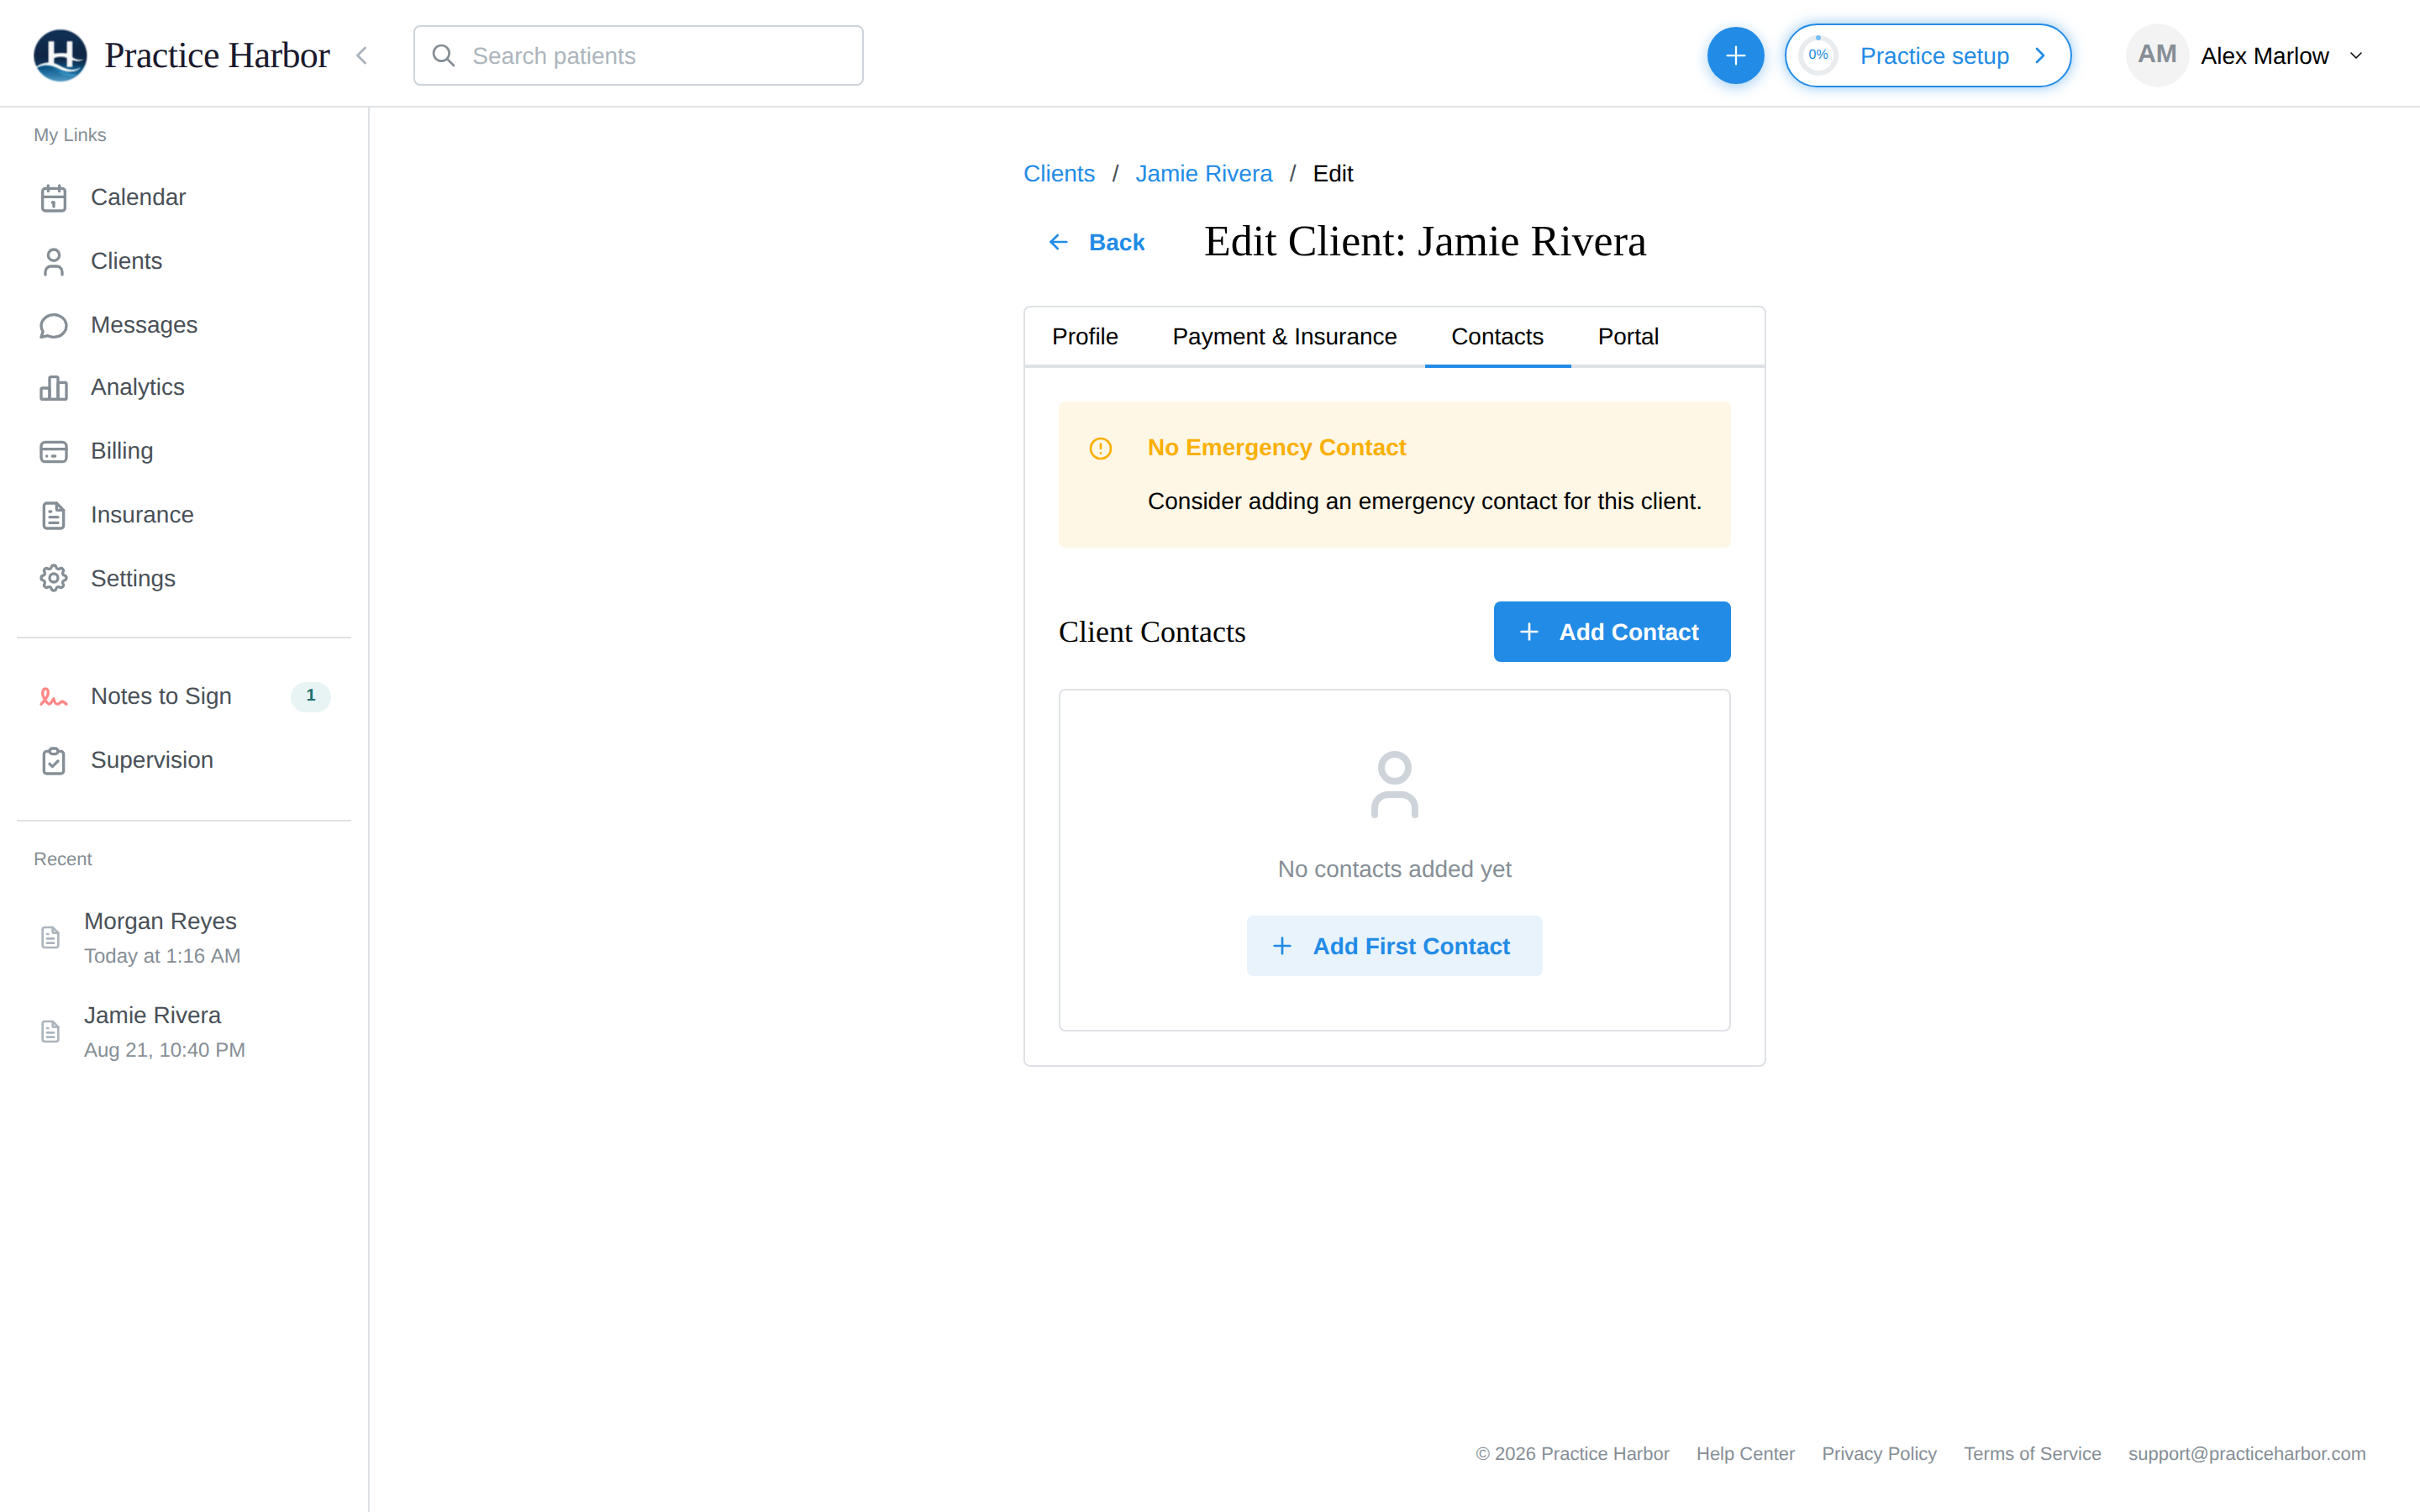
Contacts are the client's people — emergency contacts, parents/guardians, partners — each with optional portal access of their own. The tab warns you when something important is missing: a yellow No Emergency Contact alert, and an orange Minor Without Guardian alert on minors.
Adding a contact
- Click Add Contact.
- Enter their name, and pick one or more Relationships — seventeen types are available, from Emergency Contact, Guardian, and Parent through Spouse, Domestic Partner, Caregiver, and Stepparent.
- Add email (needed for portal access), phone, address, and notes.
- Check Responsible for billing to make this contact the billing guarantor — standard for minors, whose bills always go to a guardian.
- Choose what they can do in the portal (see below) and save.
Contact portal access
Each contact card shows their status (Portal Active, Portal Invited, Billing) with per-contact actions: Send Portal Invitation / Resend Portal Invitation, Disable Portal Access, edit, and delete (deleting a contact revokes their portal access too). Their permission checkboxes control exactly what they see:
- View client's upcoming appointments
- Request new appointments for client
- Send & receive secure messages
- Access billing documents
- Pay balance with credit card
See Contacts & guardians for how families use this in practice.
Portal tab

The badge shows where the client stands, and the buttons match:
| Status | Meaning | Actions |
|---|---|---|
| No Portal Access | No invitation sent yet | Send invitation |
| Invited - Pending | Invited, account not activated | Resend invitation |
| Active | Signed in and using the portal ("Last signed in" shown) | Send Password Reset, Disable portal access |
| Disabled | Access was turned off | Re-enable & send invitation |
Sending an invitation lets you pick which of the client's emails to use; the client receives a link to set their password. The client needs at least one email on the Profile tab first — the Portal tab tells you if none is on file.