Contacts & guardians
Add parents, guardians, emergency contacts, and other related persons to a client's profile. Contacts are especially important for minor clients, where a guardian typically needs portal access, billing responsibility, and the ability to complete intake forms.
In this guide, we'll cover:
- Adding a contact
- Working with minor clients
- Portal access for contacts
- Billing responsibility
- Sending intake forms to minors and guardians
- Editing a contact
- Deleting a contact
- Emergency contacts
- Relationship types
Adding a contact
- Open the client's profile and click Edit
- Go to the Contacts tab
- Click Add Contact
- Enter the contact's information:
- First name and Last name
- Relationship — select one or more from the dropdown (e.g., Parent, Mother, Father, Guardian, Emergency Contact, Next of Kin, Grandparent, Stepparent, Caregiver, Spouse, Sibling, Friend, Domestic Partner, or Other)
- Email — required for portal access and intake form delivery
- Phone — must be at least 10 digits
- Address — street, city, state, and ZIP
- Notes — free-text notes about the contact
- Set optional flags:
- Responsible for billing — designates this contact as the guarantor on billing documents
- Click Save
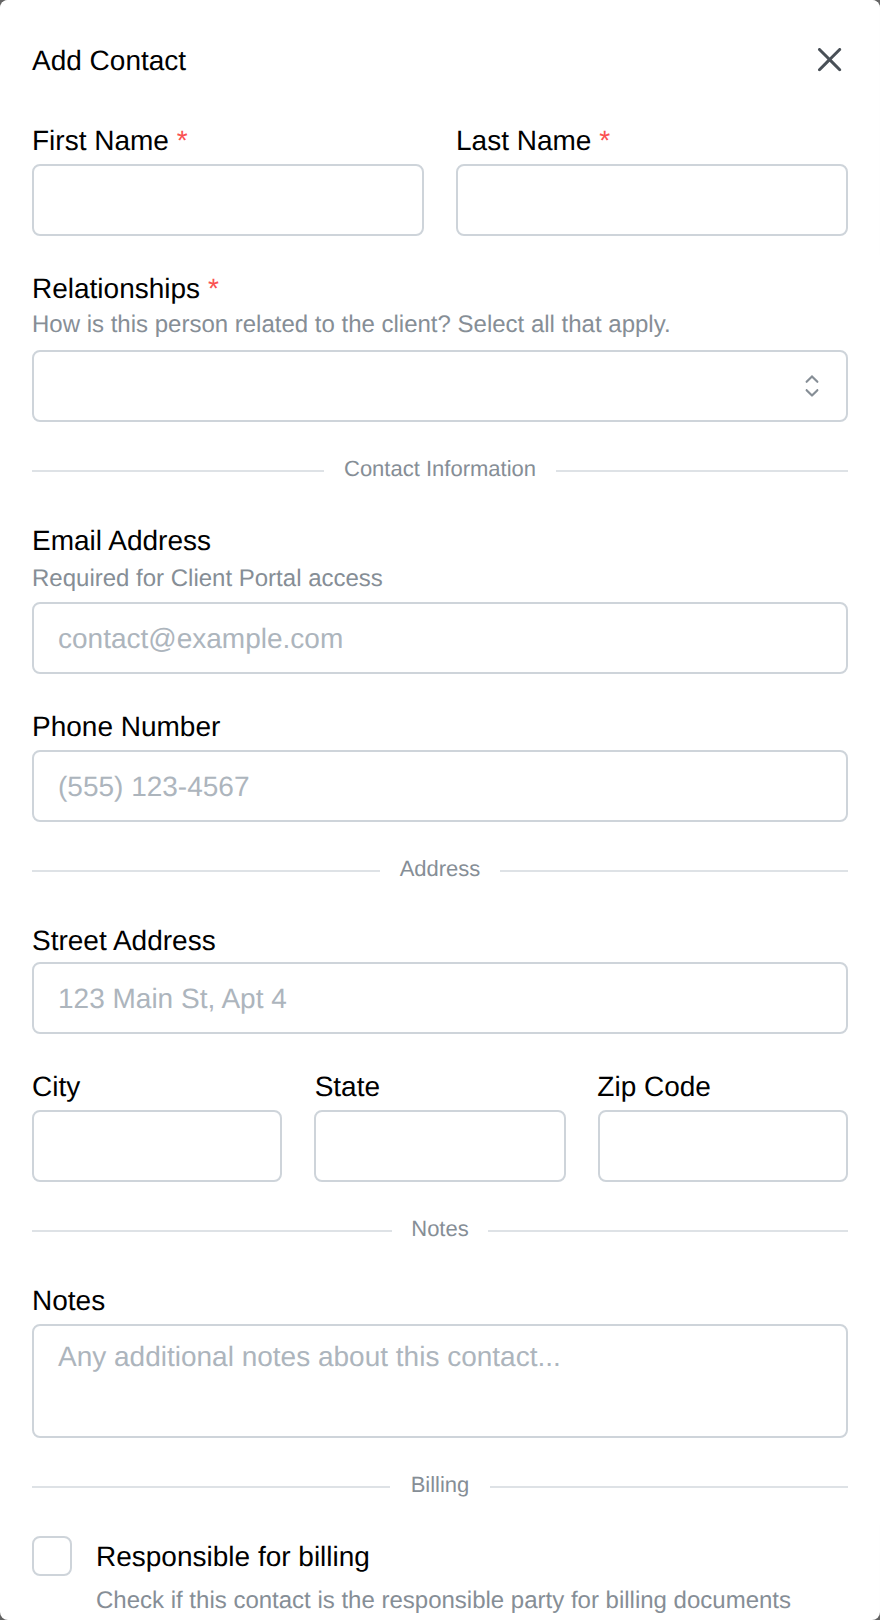
You can add multiple contacts to a single client. This is useful when a minor has divorced parents or multiple guardians who each need separate portal access.
Working with minor clients
How minors are identified
When you enter a date of birth that makes the client under 18, Practice Harbor automatically displays a Minor (under 18) label next to the date of birth field. A yellow banner also appears on the Client Info tab:
"This client is a minor. Remember to add a parent or guardian in the Contacts tab."
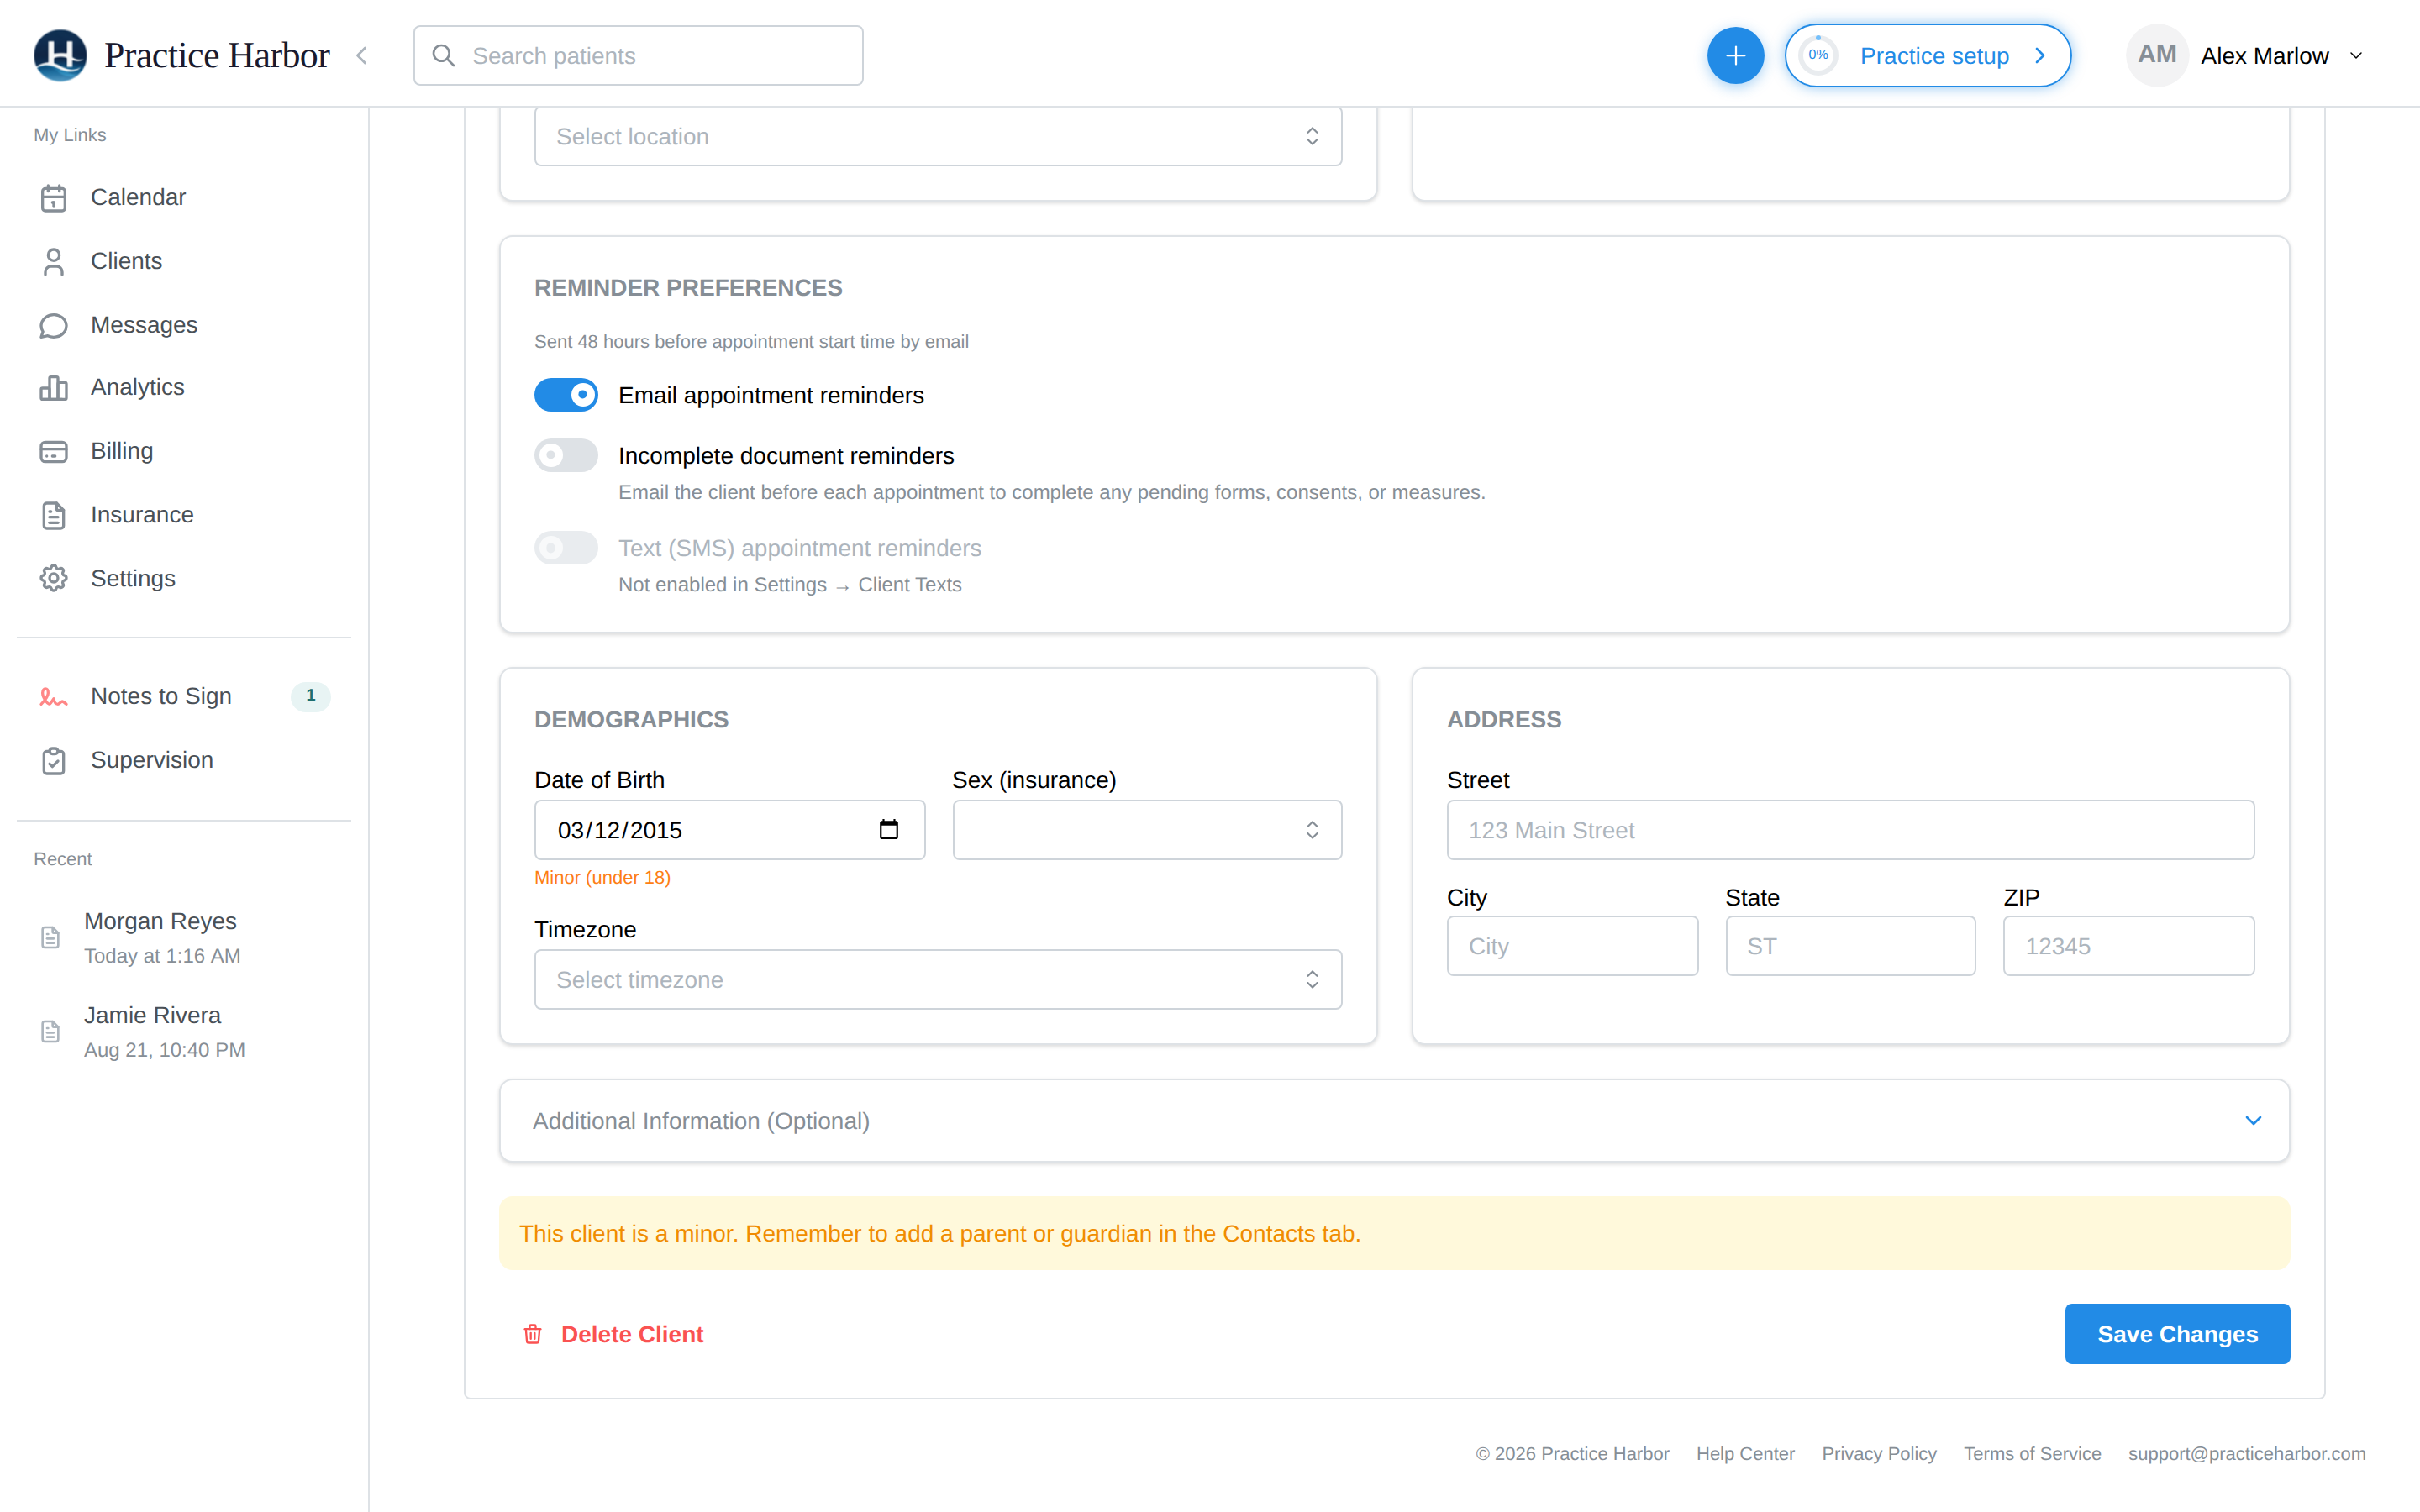
You pick the Minor client type when creating the client; the minor banner and related prompts key off the client type or an under-18 date of birth.
Setting up a minor client
- Add the client with their own name and date of birth
- Click Edit on the client's profile
- Go to the Contacts tab
- Click Add Contact and enter the parent or guardian's information
- Select a relationship type such as Parent, Mother, Father, or Guardian
- Enter the guardian's email address (required for portal access and intake forms)
- Check Responsible for billing if this guardian should be the guarantor
- Click Save
A minor client's email and phone fields should only be filled in if the minor has contact information separate from their parent or guardian. In most cases, leave these blank on the minor's own profile and enter the parent's contact details on the contact record instead.
Adding multiple guardians
You can add more than one guardian to a minor client. Each guardian can have:
- Their own portal access
- Their own email for intake form delivery
- Billing responsibility (only one contact can be the guarantor at a time)
To add a second guardian, return to the Contacts tab and click Add Contact again.
Portal access for contacts
Guardians and other contacts can receive their own portal login to view appointments, complete intake forms, and send secure messages on behalf of the client.
Inviting a contact to the portal
- Open the client's profile and click Edit
- Go to the Contacts tab
- Click Send Portal Invitation (the mail icon) on the contact's card
- The contact receives an email invitation to create their portal account
Each contact's card shows their relationship and billing badges, plus their portal state: no badge (not yet invited), Portal Invited (sent, not yet accepted), or Portal Active. Use Resend Portal Invitation if the email went missing.
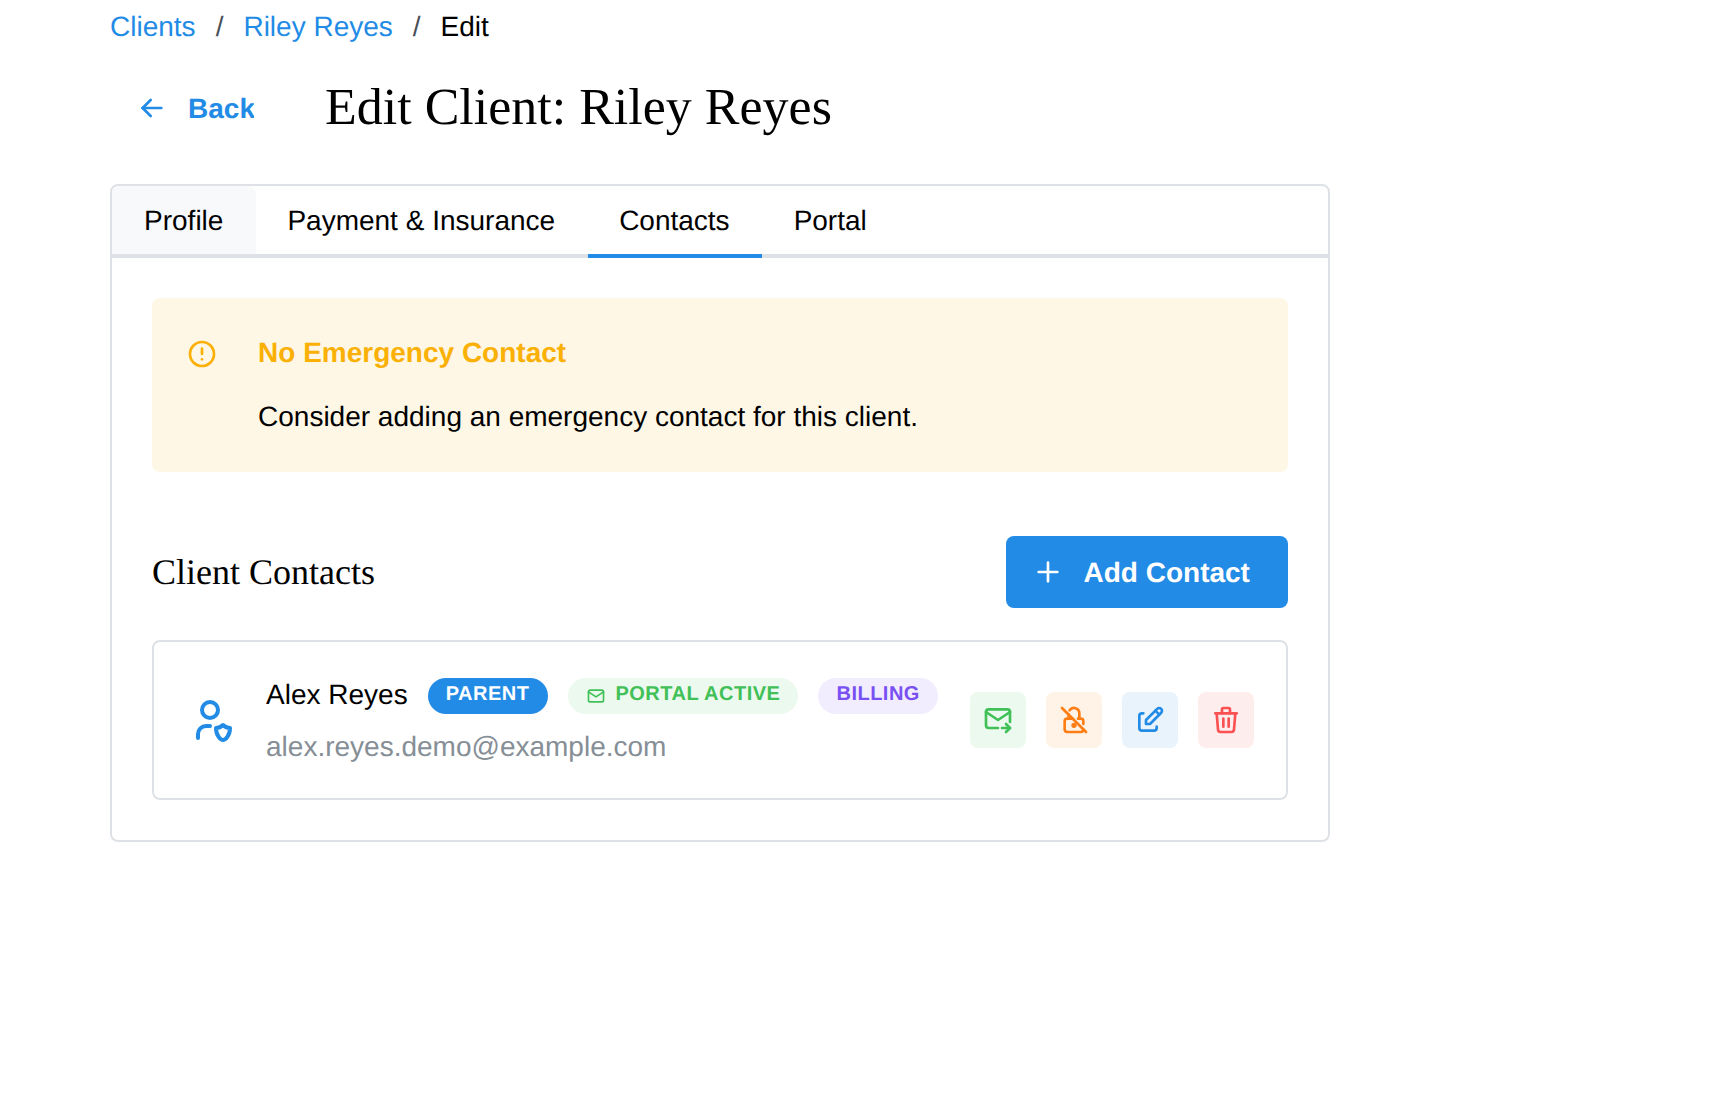
Contact portal permissions
When adding or editing a contact, you can configure what the contact can do in the portal:
- View client's upcoming appointments
- Request new appointments for client
- Send & receive secure messages
- Access billing documents
- Pay balance with credit card
All permissions default to enabled. Toggle any of them off as needed.
Revoking portal access
- Go to the Contacts tab in the client's edit page
- Click Disable Portal Access (the lock icon) on the contact's card
- Confirm in the dialog
The contact will immediately lose access to the client's portal. You can re-invite them later if needed.
If you delete a contact who has active portal access, their portal access is automatically revoked.
Billing responsibility
You can designate a contact as the responsible party for a client's billing. This is common for minor clients where a parent handles payment.
- Open the client's profile and click Edit
- Go to the Contacts tab
- Click Edit on the contact's card (or set it when adding a new contact)
- Check Responsible for billing
- Click Save
Only one contact can be the billing guarantor at a time. If you check this box for a different contact, the previous guarantor is cleared.
Sending intake forms to minors and guardians
Practice Harbor includes a dedicated intake wizard for minor clients that lets you send different forms to the minor and each of their guardians.
Using the minor intake wizard
- Start intake for the minor — from the Clients list row menu (Send Intake), or from the Portal Documents card on their profile (Send Intake)
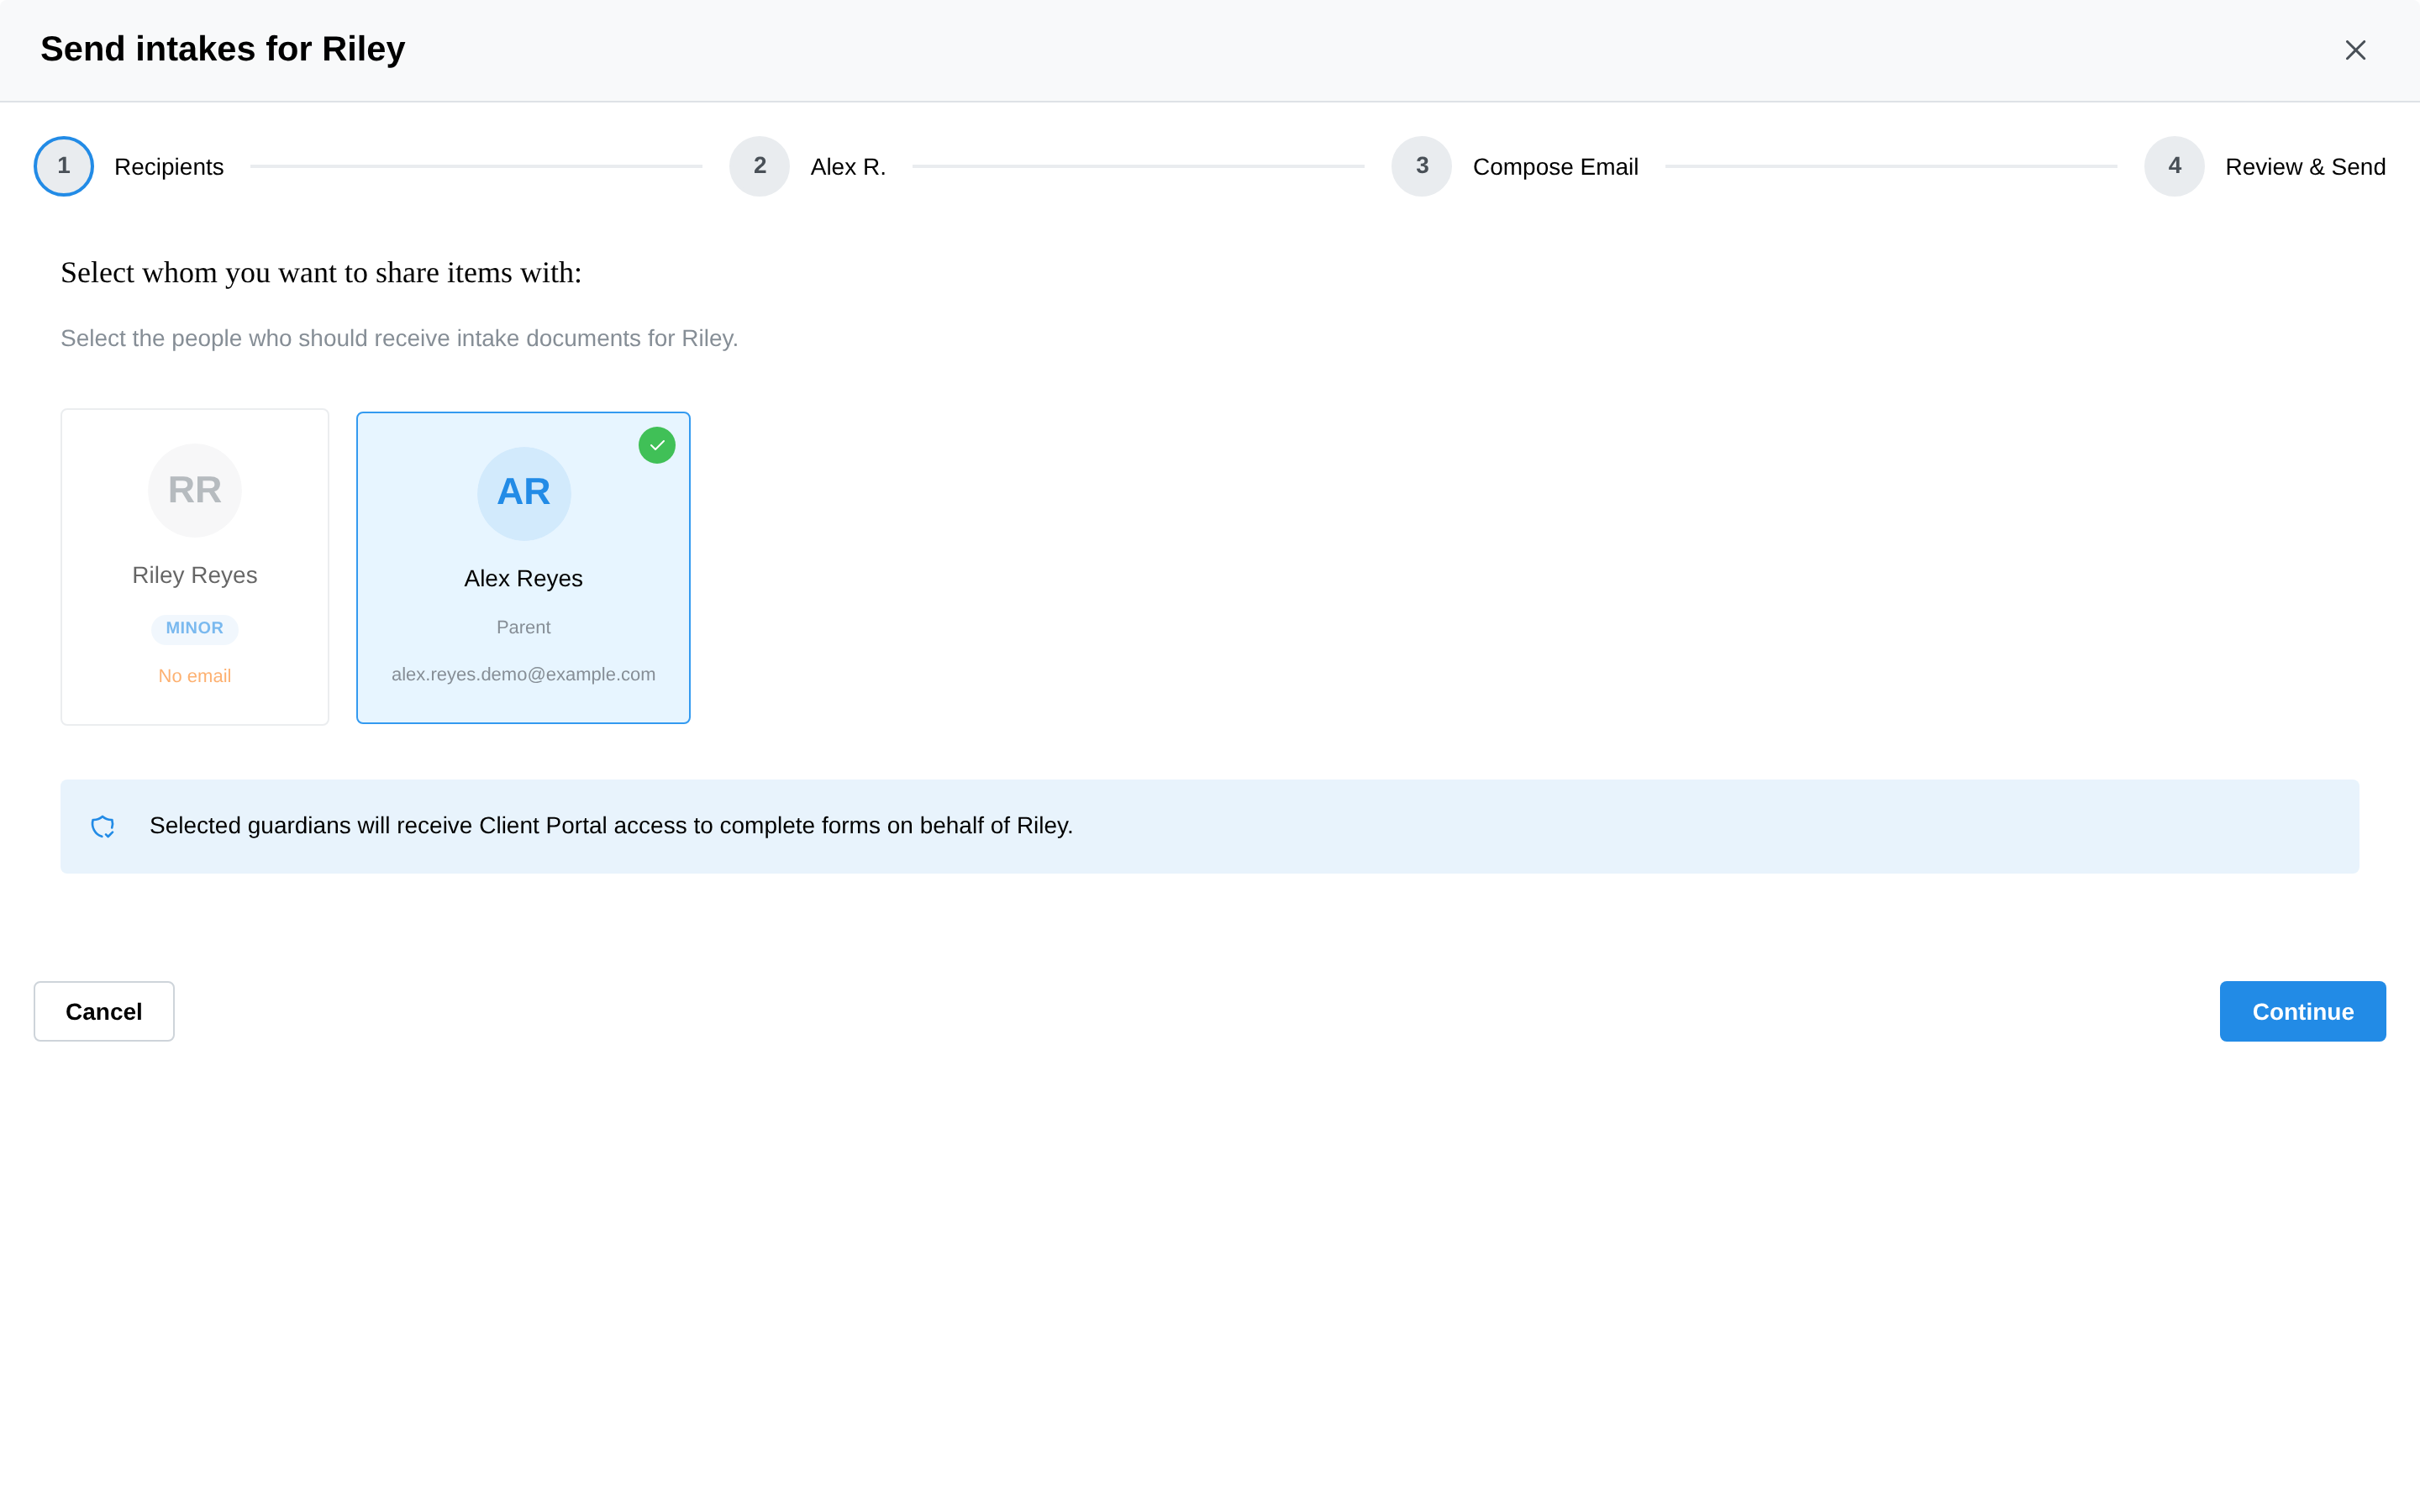
- Because the client is a minor, the Minor Intake Wizard opens, with the following steps:
Step 1: Select Recipients Choose who should receive intake forms. The wizard lists the minor client and all contacts with an email address. Check or uncheck each recipient.
Step 2: Select Documents (per recipient) For each selected recipient, choose what they get — the same four sections as an adult intake: Questionnaires, Consent Forms, Scored Measures, and Demographics & Credit Card (the demographics answers save to the minor's profile; the card request goes to the recipient)
You can assign different forms to the minor and their guardian. For example, send a demographic questionnaire to the guardian and a self-report assessment to the minor (if old enough).
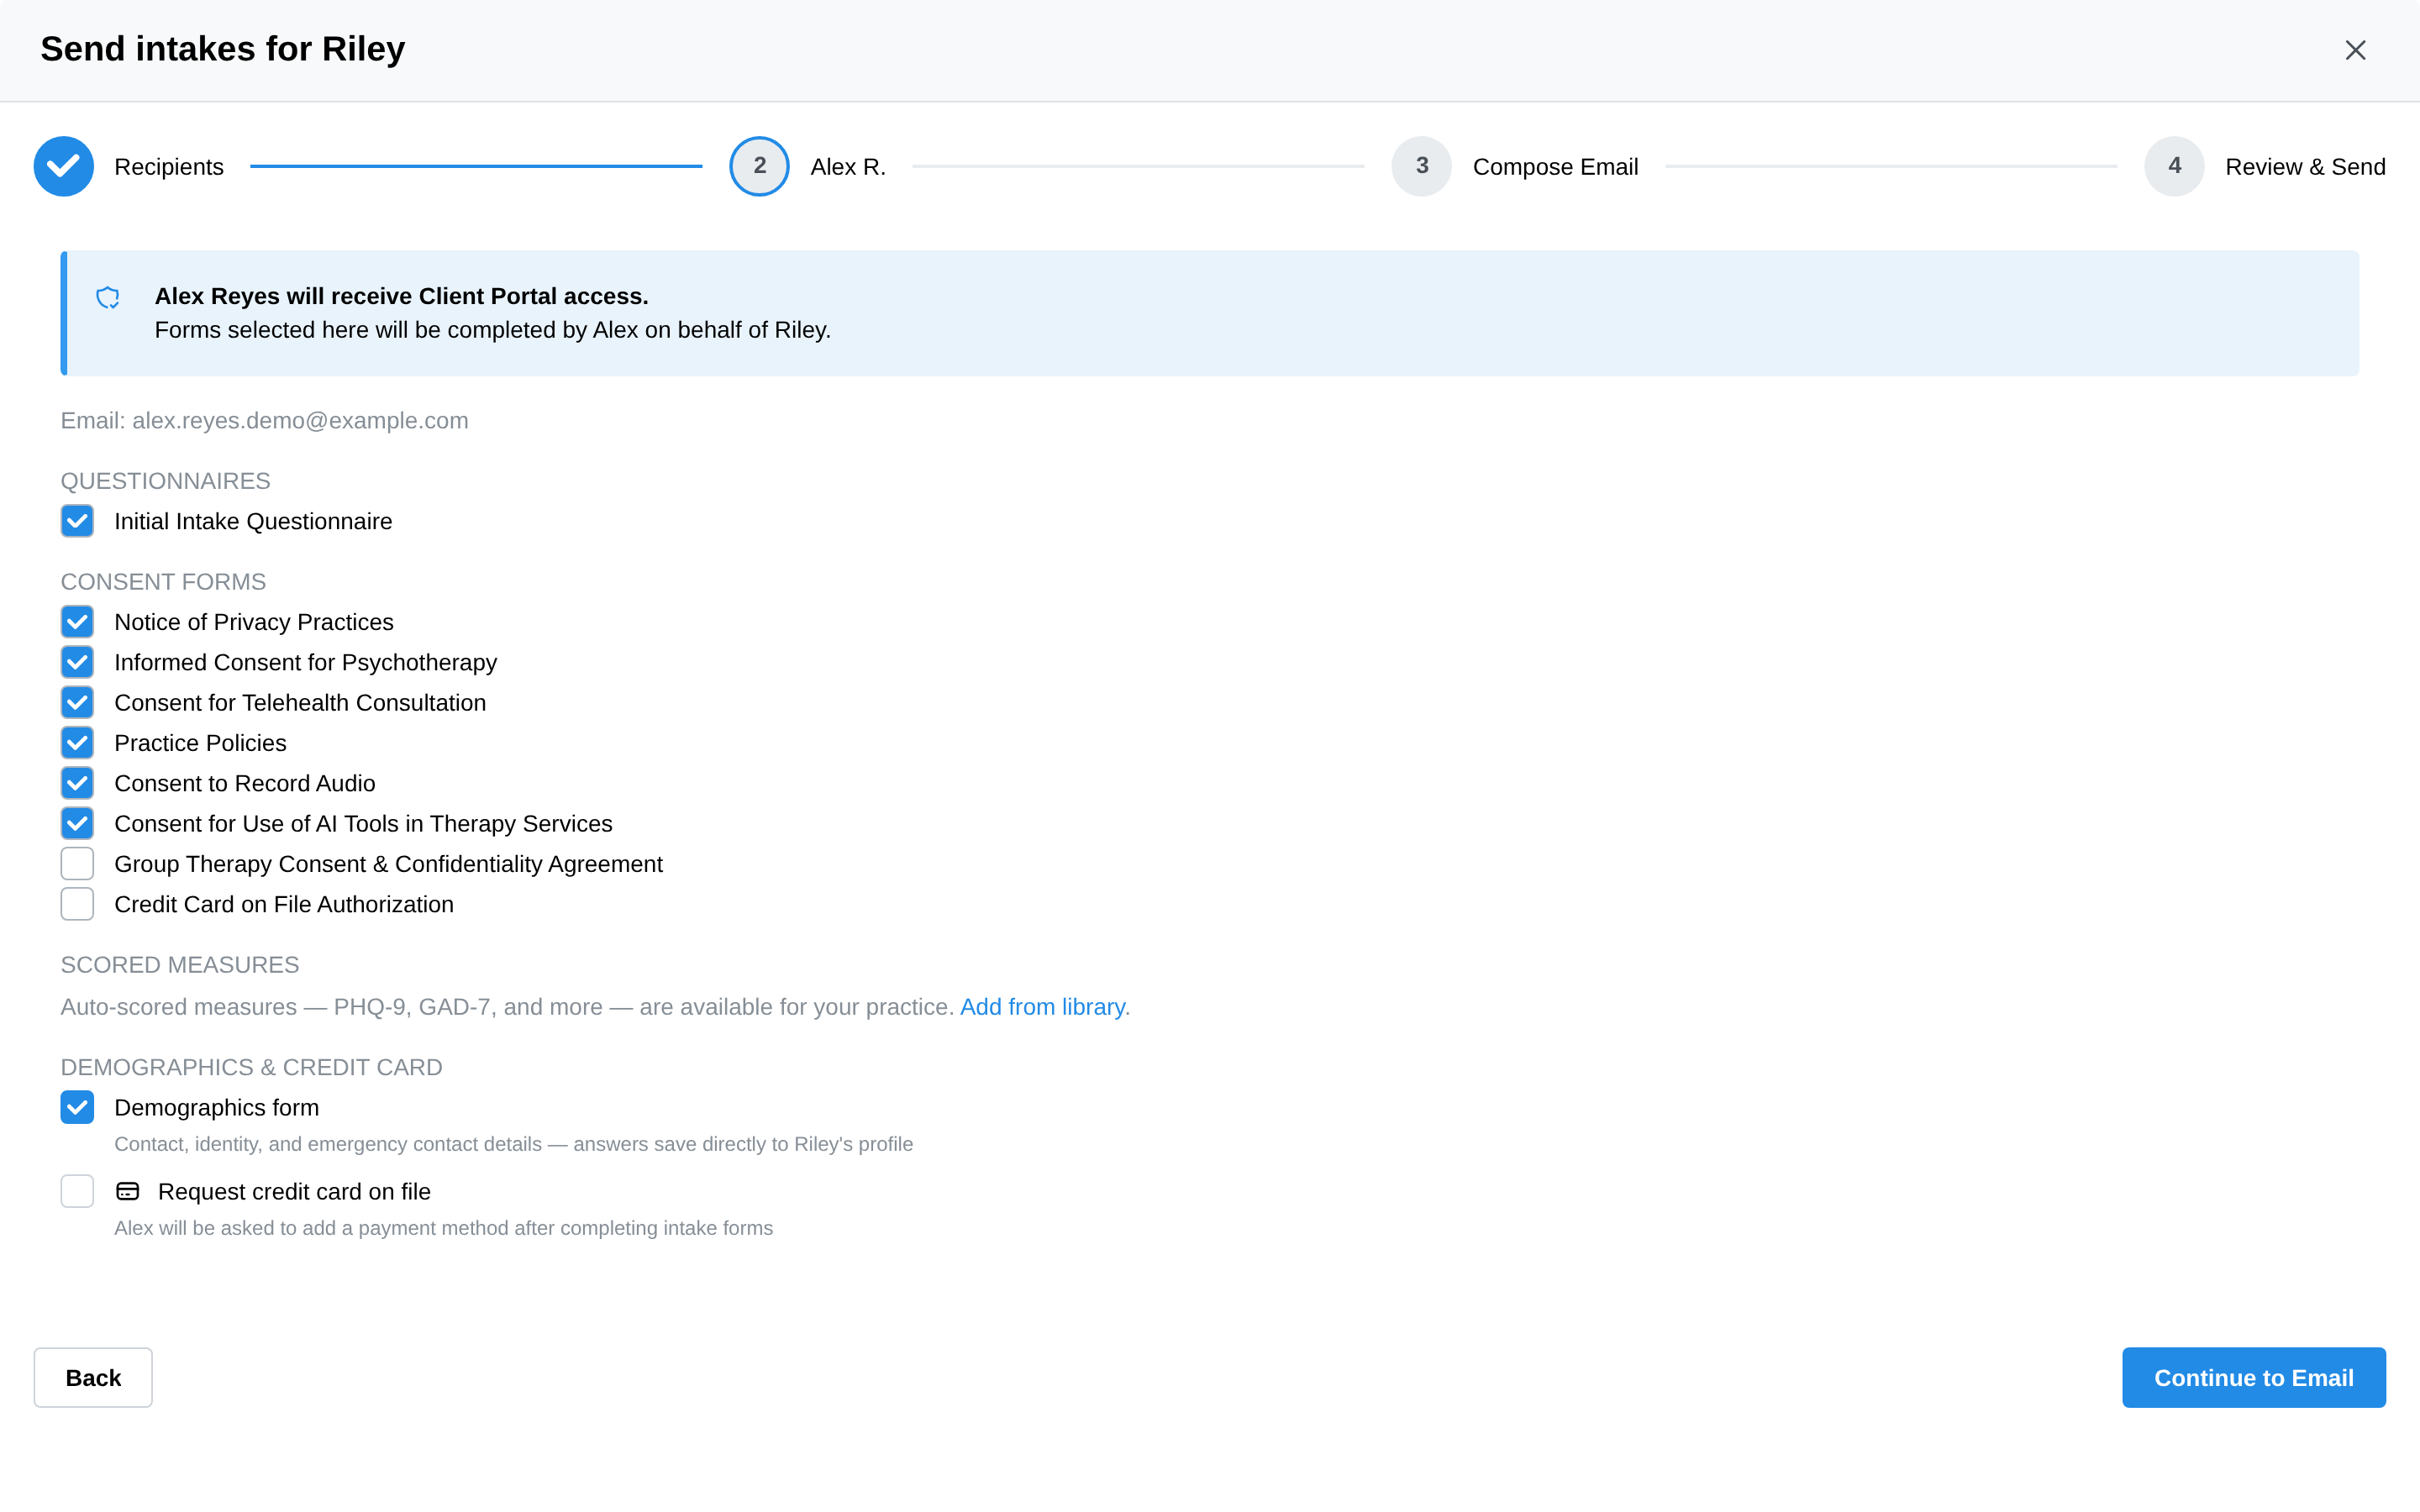
Step 3: Compose Emails Customize the email that each recipient will receive. Guardian emails automatically use guardian-specific templates with macros like:
{guardian_first_name}— the guardian's first name{minor_first_name}and{minor_full_name}— the minor client's name{clinician_full_name}and{practice_name}— your practice details{practice_client_portal_login_link}— link to the portal login
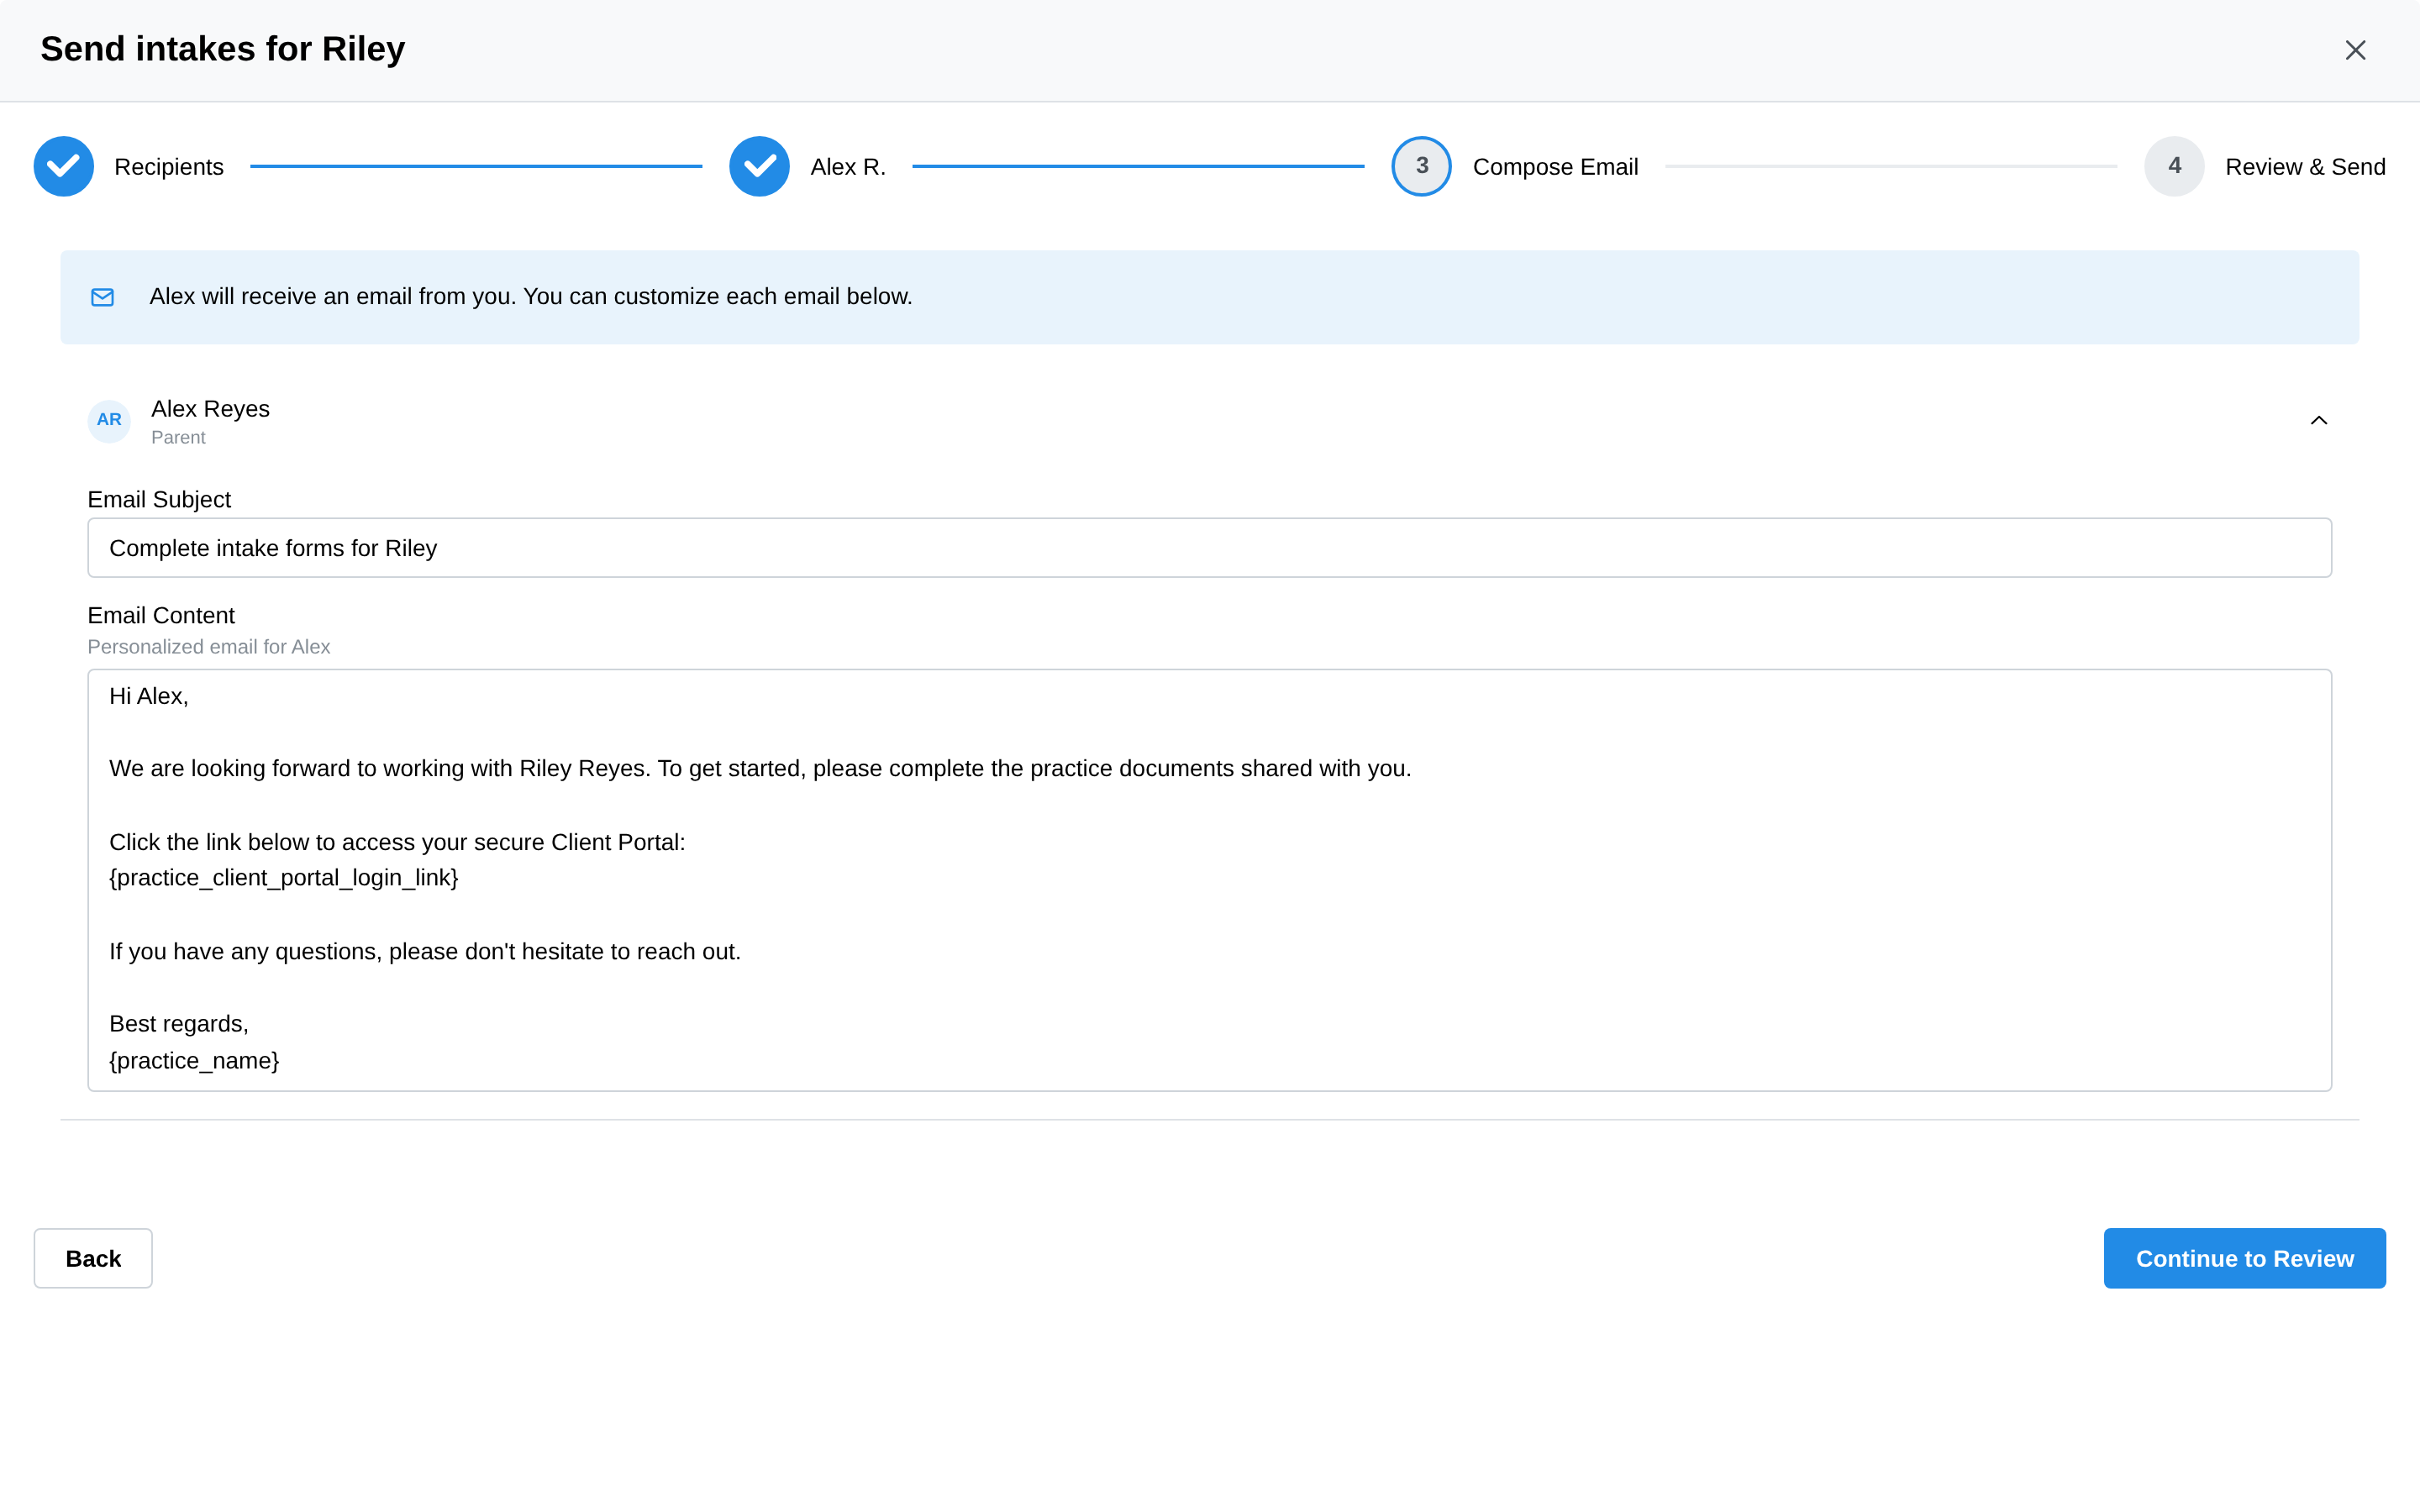
Step 4: Review and Send Review all recipients, their assigned forms, and email content. Click Share & Send Now to deliver everything at once.
Sharing additional documents later
You can share documents with a minor and their guardians at any time, not just during initial intake:
- Open the minor client's profile
- Click Share Documents
- The same wizard opens in "share" mode
- Select recipients, choose documents, and send
Each recipient can be included or excluded individually.
Editing a contact
- Open the client's profile and click Edit
- Go to the Contacts tab
- Click the Edit icon next to the contact's name
- Update any fields
- Click Save
Deleting a contact
- Open the client's profile and click Edit
- Go to the Contacts tab
- Click the Delete icon next to the contact's name
- Confirm the deletion
When a contact is deleted:
- Their portal access is automatically revoked
- If they were the billing guarantor, the guarantor is cleared from the account
- An audit log entry is created
Emergency contacts
Give at least one contact the Emergency Contact relationship type. Until you do, the Contacts tab shows a yellow No Emergency Contact alert — "Consider adding an emergency contact for this client." (visible in the screenshot above).
Relationship types
Practice Harbor supports the following relationship types:
| Relationship | Description |
|---|---|
| Emergency Contact | Primary emergency contact |
| Next of Kin | Next of kin |
| Guardian | Legal guardian |
| Parent | Parent (general) |
| Mother | Mother |
| Father | Father |
| Spouse | Spouse |
| Sibling | Sibling |
| Child | Child |
| Grandparent | Grandparent |
| Stepparent | Stepparent |
| Friend | Friend |
| Caregiver | Caregiver |
| Domestic Partner | Domestic partner |
| Other | Other relationship |
You can assign multiple relationship types to a single contact (e.g., both "Mother" and "Emergency Contact").