Online booking
Online booking is review-and-approve: clients request times, you get the final say, and nothing lands on your calendar without you. Existing clients request through the client portal; prospective clients use your public booking page — reachable directly or through a button widget embedded on your own website.
In this guide, we'll cover:
- Turning on online booking
- Setting your cancellation policy
- Adding the booking widget to your website
- Choosing which clinicians take new clients
- What prospective clients see
- Reviewing appointment requests
- Declined requests
- Prescreening new clients
- Troubleshooting & FAQ
Turning on online booking
- Go to Settings → Online Booking.
- Turn on Accept Online Booking Requests — this is your personal switch for portal requests from existing clients. Set your bookable hours while you're here — see Availability.
- To take requests from new prospects too, turn on Accept Requests from New Clients (practice-wide; owners and practice managers only), and optionally Allow couples requests.
- Click Save Changes.
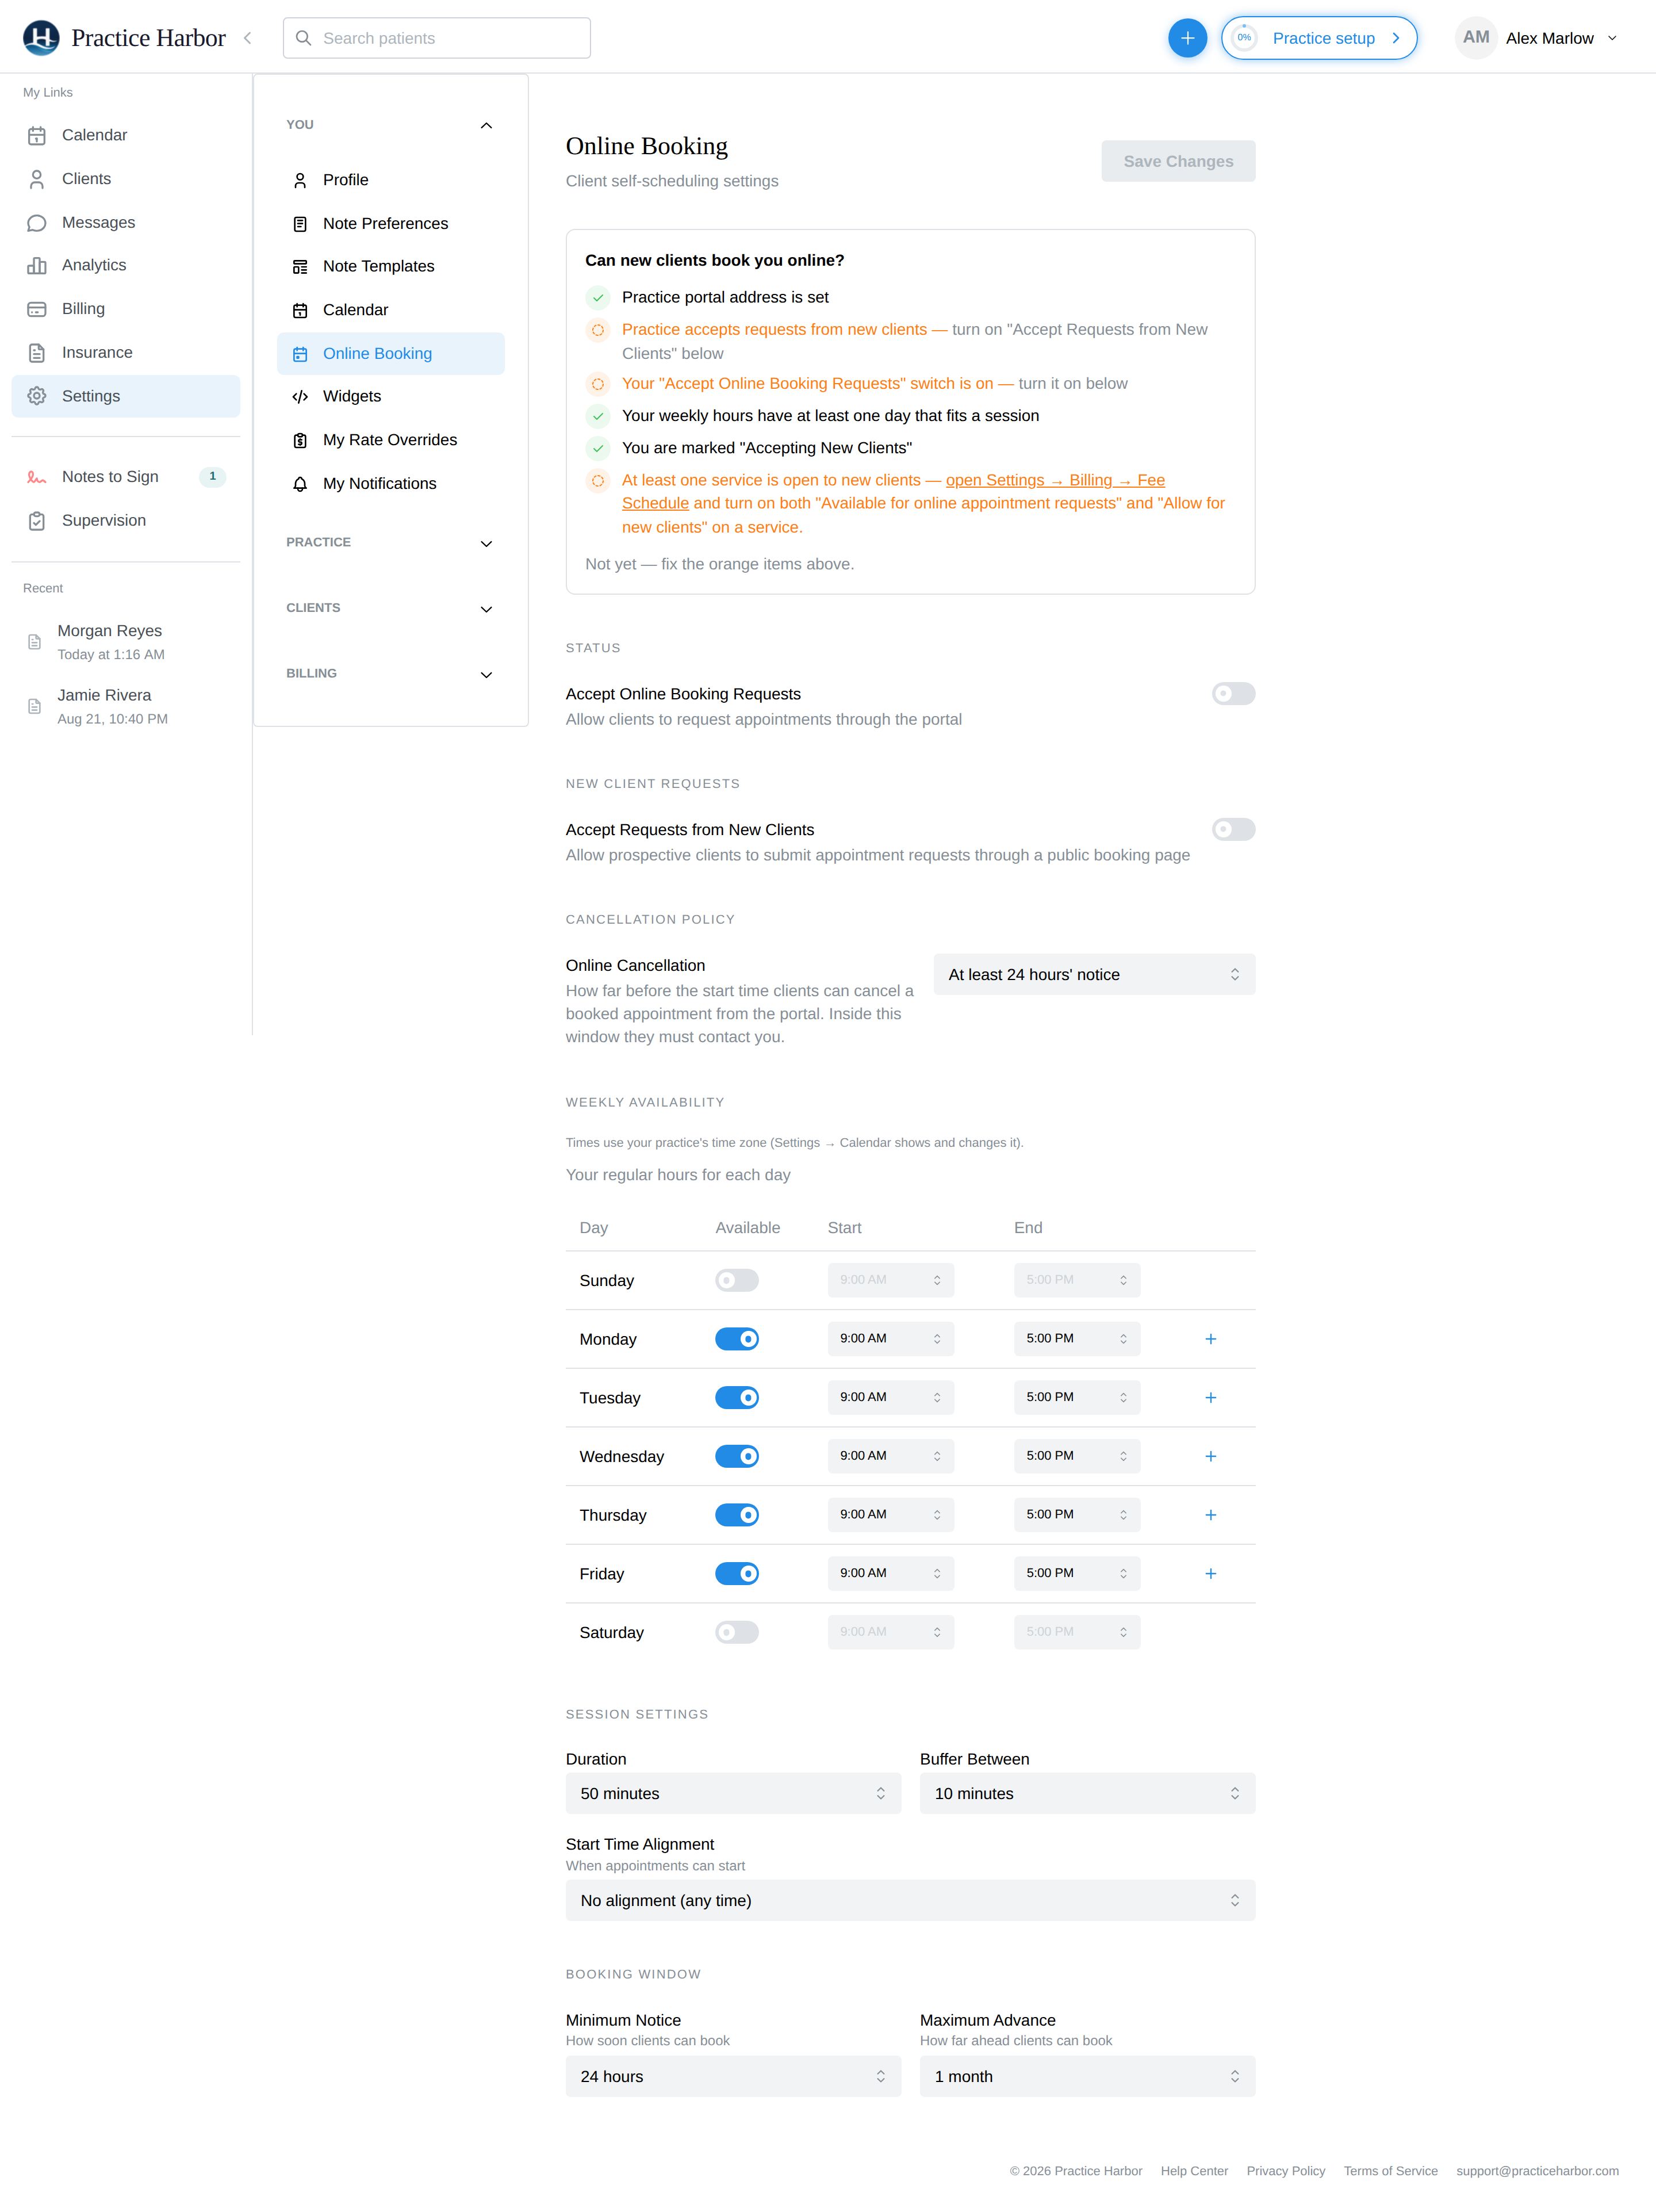
Your public booking page lives at your practice's portal address (your-practice.securehealth.me/book).
The portal address is set once in Settings → Patient Portal — the Widgets page will warn you
if it's missing.
Setting your cancellation policy
Decide whether clients can cancel their own confirmed appointments from the portal, and how much notice they must give:
- Go to Settings → Online Booking and find Cancellation Policy (owners and practice managers only).
- Choose Clients must contact the practice (the default — no online cancellation), or a notice window: at least 24, 48, or 72 hours.
With a window set, clients see a Cancel Appointment button on upcoming appointments until the window closes; after that the portal tells them to contact you. When a client cancels, the appointment is marked Cancelled with a Client canceled note on your calendar, any planned charge for the session is released, and you get an email. Clients can never cancel inside your window or cancel couples, family, or group sessions online — those always come through you, and you decide how to handle them (see the appointment's status menu).
The policy line ("This practice requires at least 24 hours' notice to cancel") also appears to clients when they book, so the expectation is set up front. State your full policy — including any late-cancellation fee — in your consent paperwork; to charge a late fee today, add a product line to an invoice (Settings → Products).
Adding the booking widget to your website
- Go to Settings → Widgets, Appointment request tab.
- In the clinician table, pick the Practice-wide row (visitors choose their clinician) or a specific clinician's row (bookings go only to them).
- Click Copy code.
- Paste the snippet into your website's HTML where the button should appear.
- Click Preview Widget to see exactly what visitors will get.
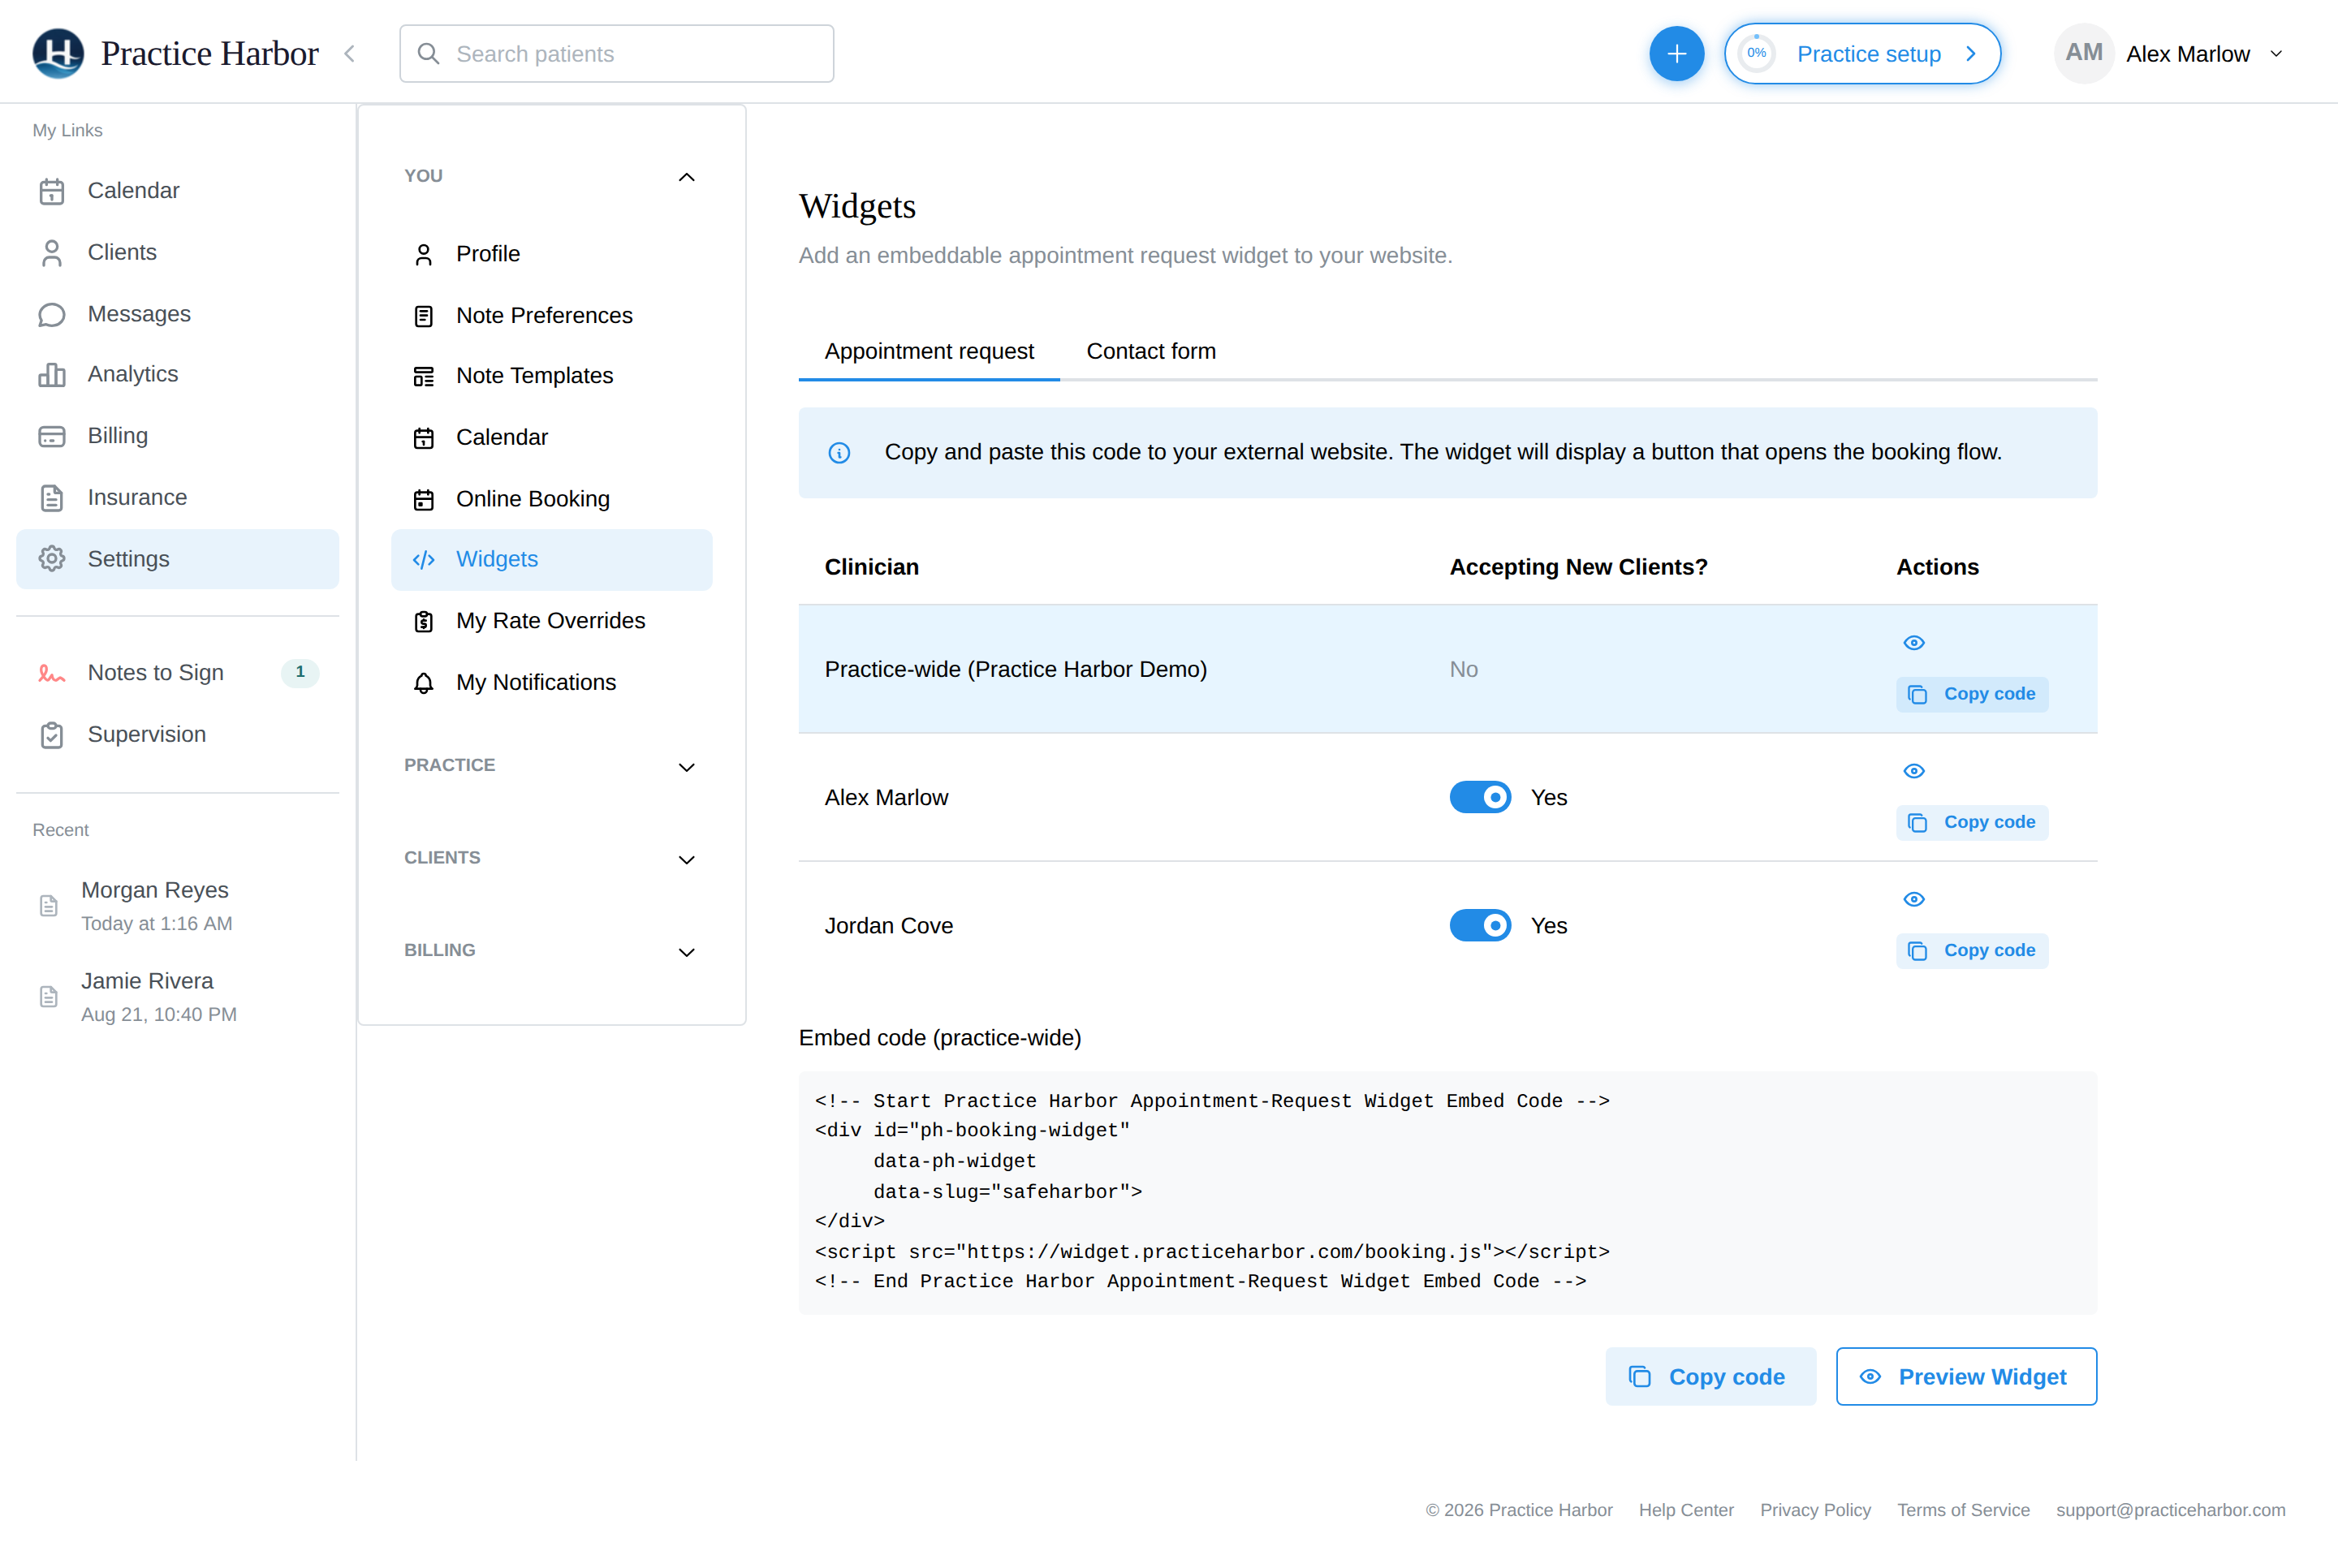
The widget renders a single button; clicking it opens your booking page in an overlay, so
visitors never leave your site. The Contact form tab generates a second widget that opens
your contact/inquiry form instead — you can put both on the same page (include the <script>
line only once).
Customizing the widget
The generated snippet supports a few optional attributes you can add to the <div> by hand:
| Attribute | What it does | Default |
|---|---|---|
data-button-text | The button's label | "Request Appointment" (booking) / "Contact Us" (contact) |
data-button-color | The button's background color — a hex value like #2b8a3e or a CSS color name like seagreen | #228be6 (blue) |
data-type="contact" | Makes the button open the contact form instead of the booking page (the generated Contact Form snippet already includes this) | booking |
data-practitioner | Limits booking to one specific clinician — set automatically when you pick a clinician in Settings → Widgets before copying the code | all accepting clinicians |
For example, a green button that reads "Schedule with me":
<div id="ph-booking-widget"
     data-ph-widget
     data-slug="your-practice"
     data-button-text="Schedule with me"
     data-button-color="#2b8a3e">
</div>
<script src="https://widget.practiceharbor.com/booking.js"></script>
The button inherits your site's font and can be further restyled with your own CSS by targeting
the container div. The pop-up dialog is keyboard- and screen-reader-accessible: it announces
itself as a dialog, keeps keyboard focus inside while open, and closes with the Escape key
or the close button.
Choosing which clinicians take new clients
The Widgets clinician table has an Accepting New Clients? switch per clinician:
- Every clinician can flip their own switch.
- Flipping a colleague's switch requires a practice owner or manager.
- A clinician also needs their own online booking turned on for any times to actually show — the switch here controls whether they're offered to new clients.
What prospective clients see
The booking page walks a new client through, step by step:
- Provider — pick a clinician (skipped when the widget targets one clinician).
- Service — your bookable services, with duration and price.
- Location — only if the practice has more than one.
- Date & time — a calendar dotted with available days (starting tomorrow — same-day requests aren't offered), then morning/afternoon/evening time slots.
- Screening — your prescreener questionnaire, if you've set one up.
- Contact details — name, email, phone, date of birth, and who the care is for: Me, My partner and me (couples, if you allow them — partner details collected too), or Someone else (a parent or guardian booking for a minor — the guardian's own details are collected alongside).
After Submit Request they see "Request Submitted" and get a confirmation email; they're told you'll be in touch once you've reviewed it.
Reviewing appointment requests
Requests from new clients (your booking page) and from existing clients (the client portal) land on one page: Requests in the left menu, with a count of pending ones. You're also emailed when one arrives.
- Click Requests in the left menu. The Pending tab lists every open request: who, which clinician, the requested date, time and service, and when it came in. A New client or Existing client chip tells you which kind it is; Couple and Minor chips appear where relevant. Owners, managers and schedulers see the whole practice and can filter by clinician, client kind and source; other clinicians see their own clients' requests.
- Click a row to read the full request — contact details, reason for visit, prescreener answers, a How they found you line when the request came in through an ad or campaign link, partner details for couples, and "Booked by" details when a guardian submitted it.
- Click Accept. For a new client this creates the client record (and for couples: the partner and their couple grouping), emails a portal invitation, books the requested time on your calendar, and takes you to the new chart with the intake-document picker open so you choose which forms and consents to send — nothing is assigned automatically. For an existing client it books the time and emails them a confirmation.
- Or open the ··· menu and click Decline. For a new client a message is prefilled naming the requested time with a link to your booking page so they can pick another; edit it as you like. Leave Save them as an archived client so you can reach out later ticked to keep a client record (untick it for spam or a duplicate). For an existing client, add an optional reason. Click Confirm decline — the client is emailed either way.
The ··· menu also has View client and View on calendar. Pending requests draw on your calendar as provisional tiles; clicking one opens the request here.
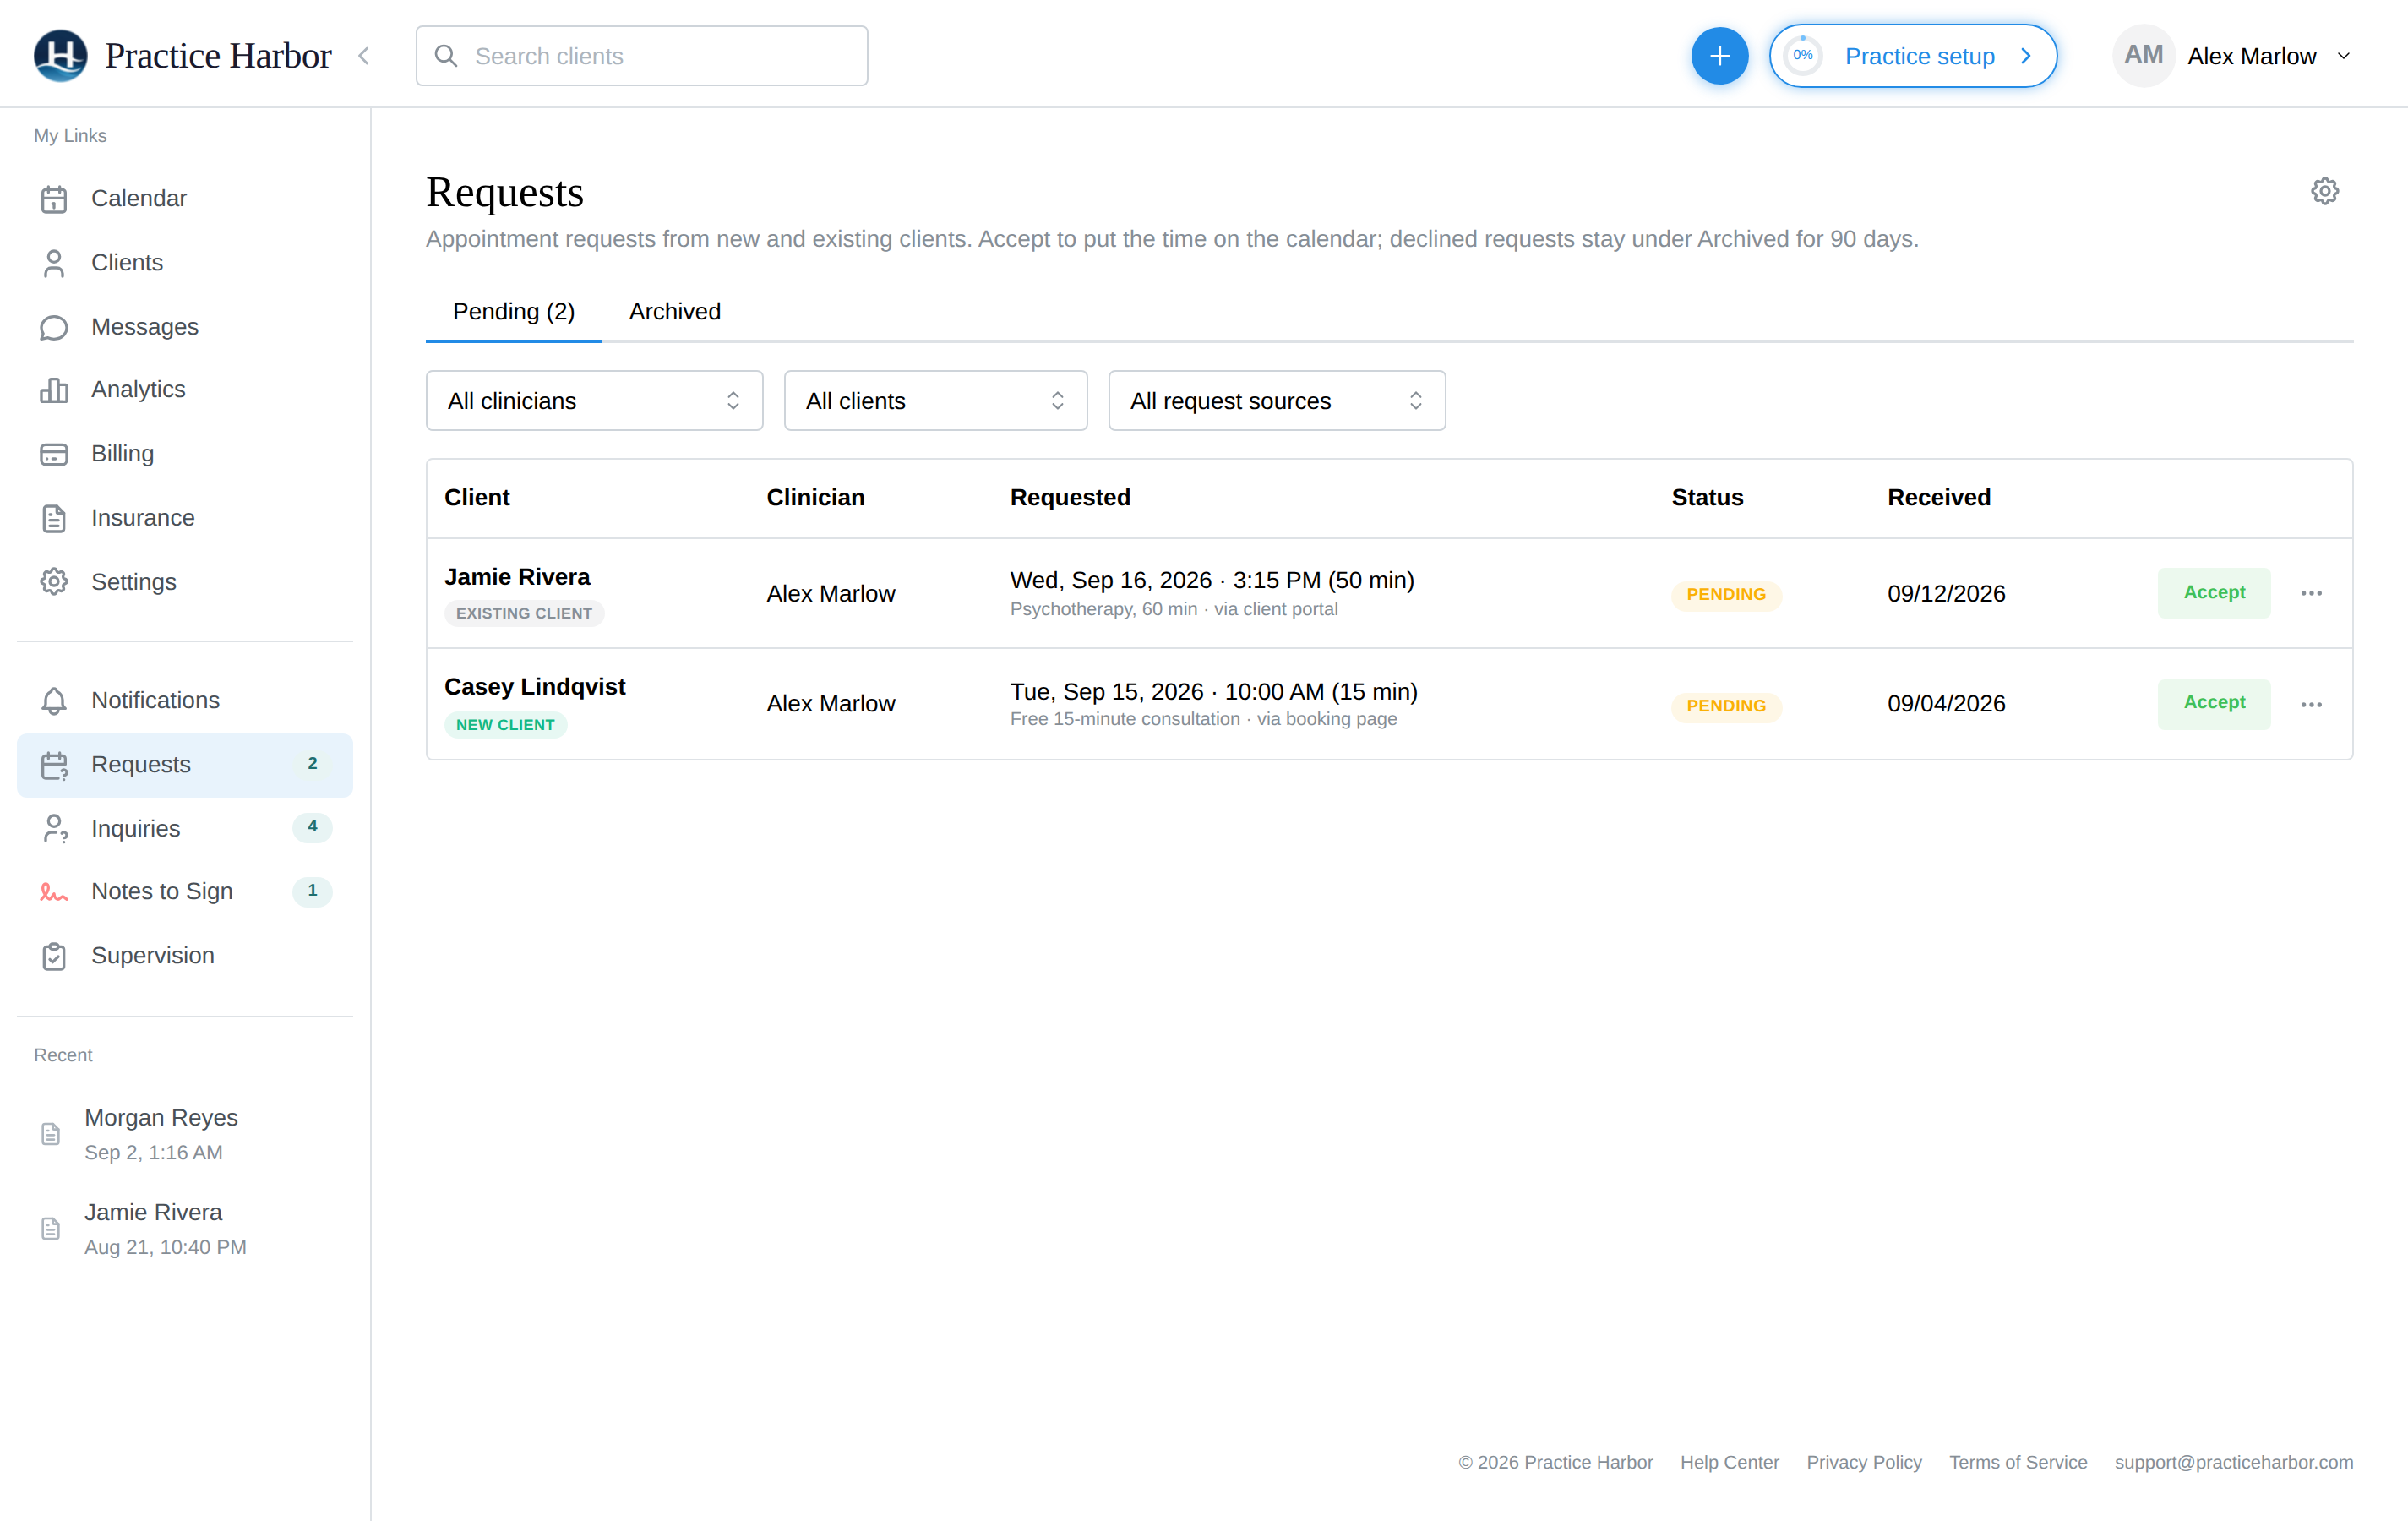
New-client requests also appear on the Inquiries page, alongside contact-form messages and new clients who haven't had a session yet - see Inquiries.
Declined requests
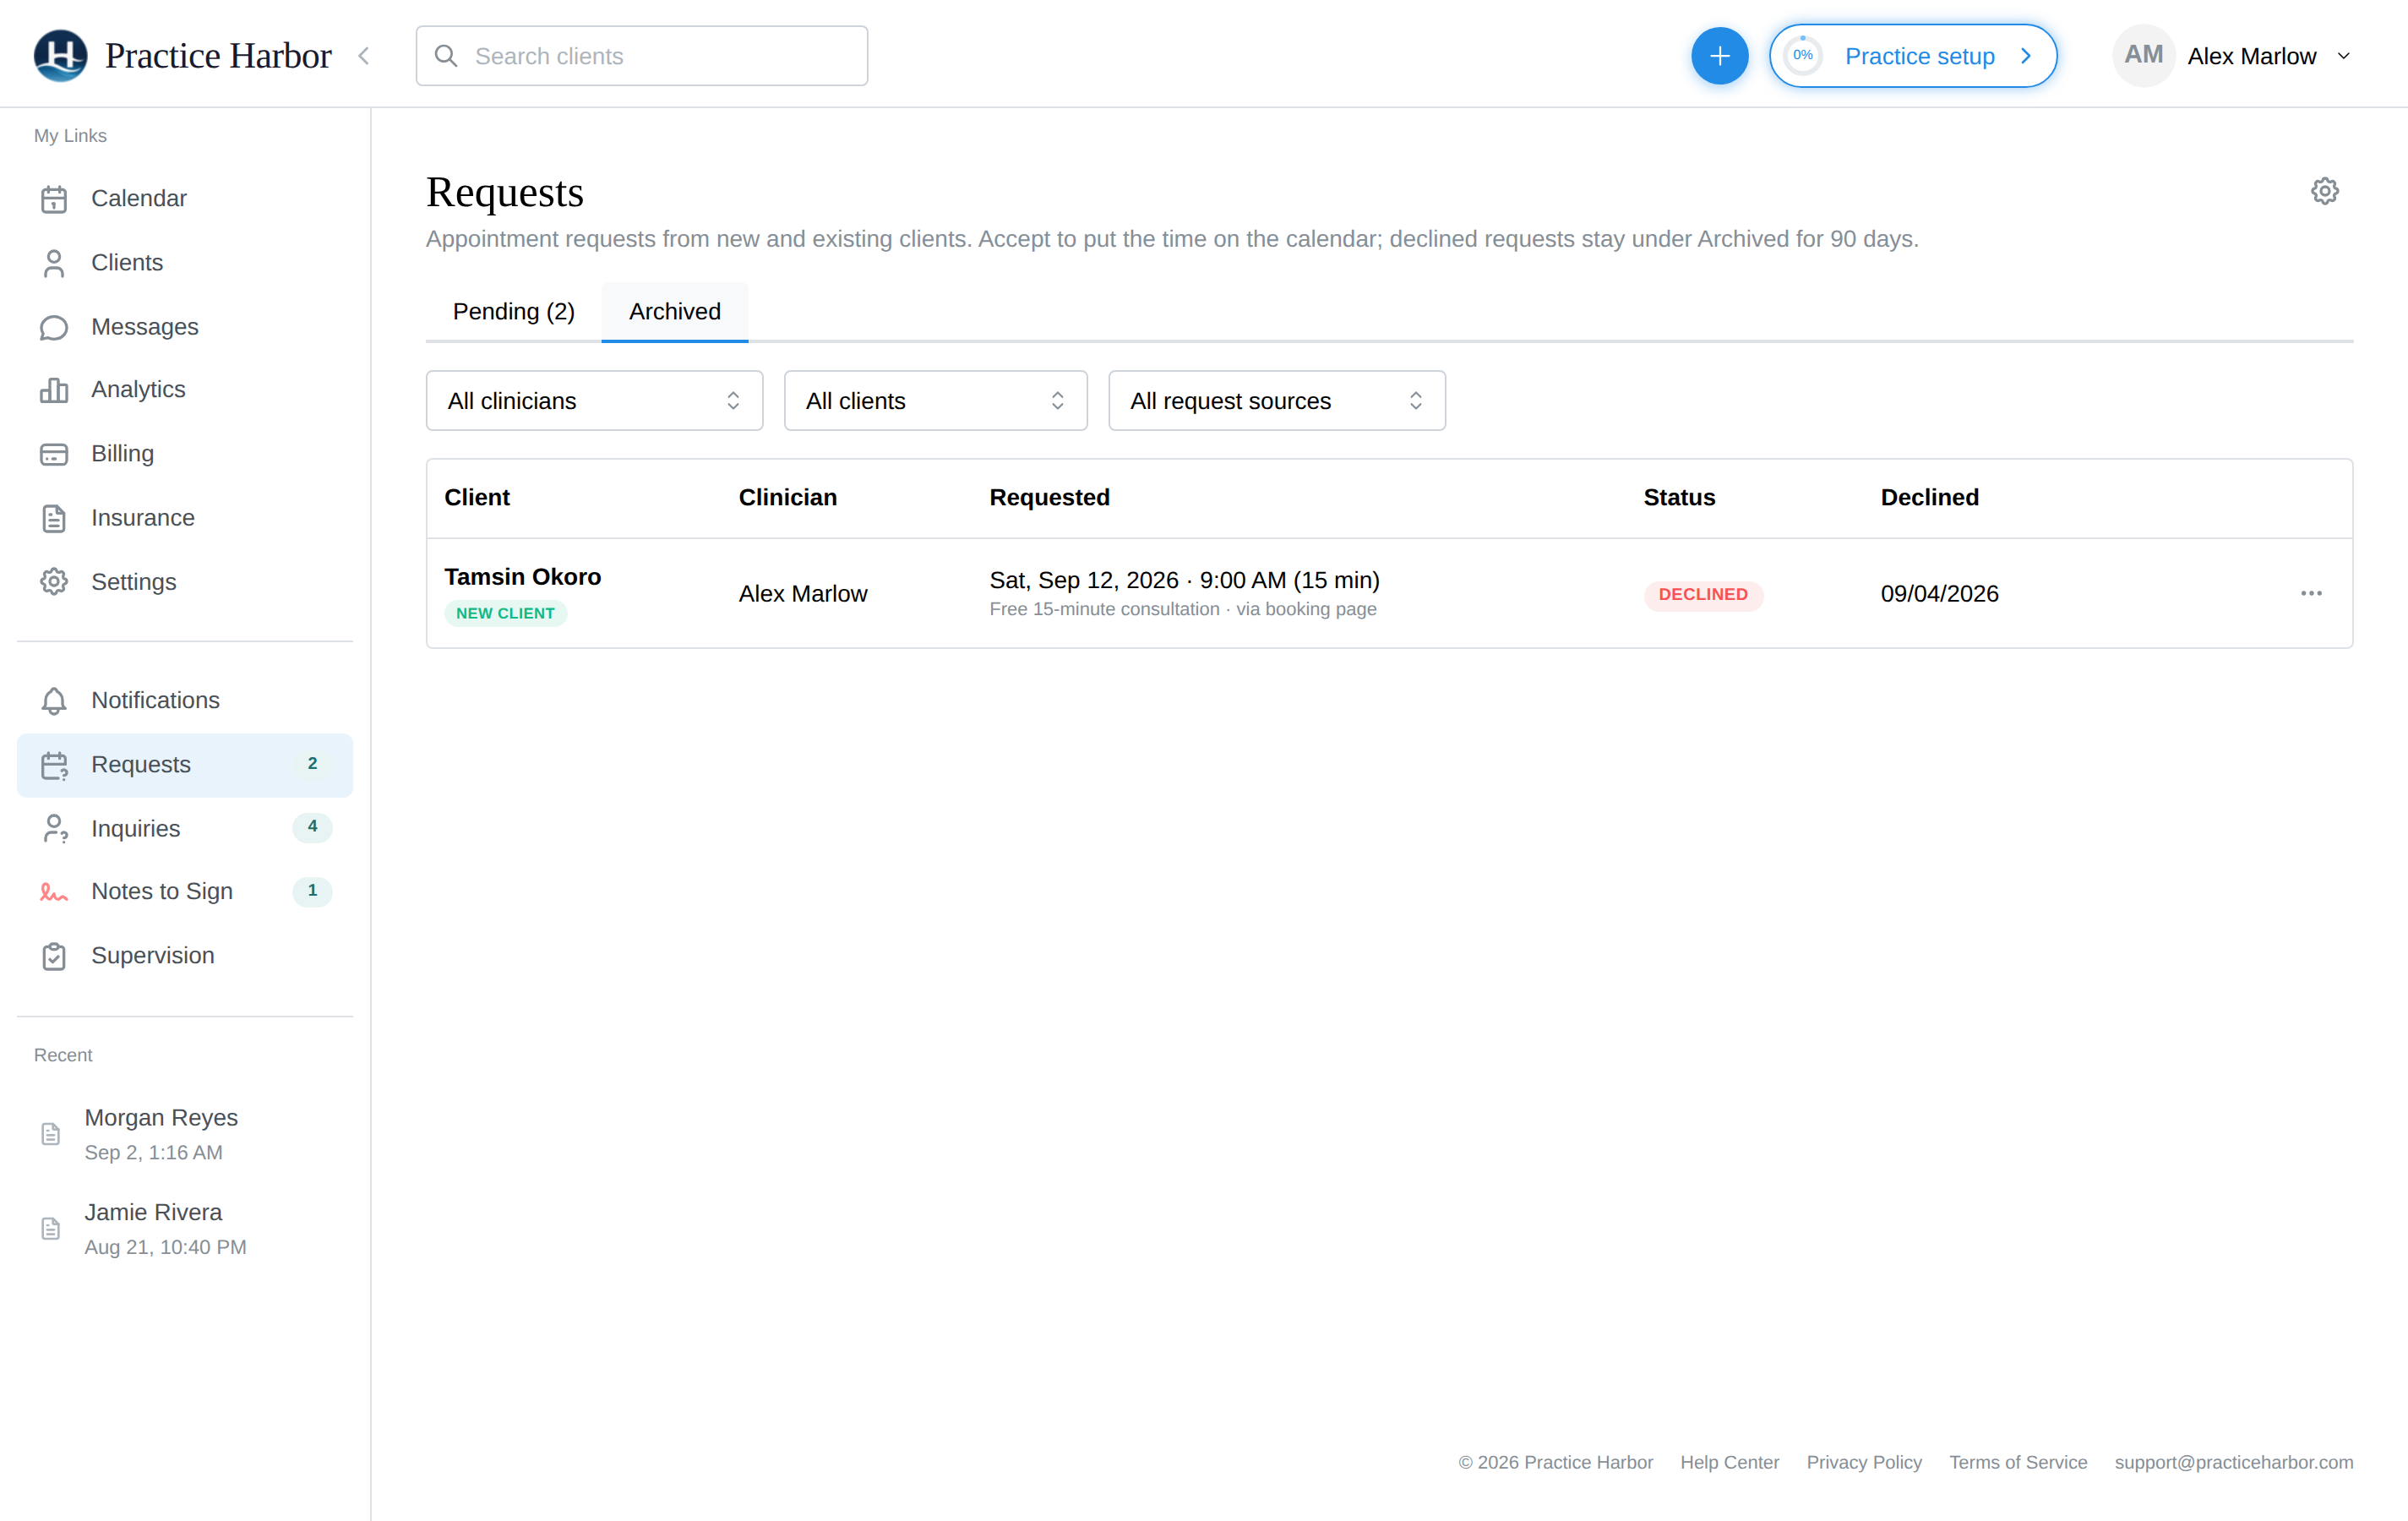
Declining a request doesn't erase it. Click the Archived tab on the Requests page to see every request declined in the last 90 days with the details it arrived with.
- If you kept a client record when declining a new client, click Open archived client to go to their chart. Archived clients don't show in the client list by default — switch the list to Include inactive to see them, and set them back to Active from their chart when a spot opens up. They get no reminders or portal invitation until you do.
- If you declined without keeping a record, click Save as archived client to create one now.
- A declined existing client gets an email with a link to their portal, where they can request another time.
Prescreening new clients
If you want to vet fit before offering time, enable the Prescreener (Settings → Prescreener, under Clients): a short screening questionnaire prospective clients complete as part of an appointment request from the public booking page. Their answers arrive with the request, so you approve or decline with context instead of scheduling a consult blind. Setup and question editing: Prescreener Questions.
Troubleshooting & FAQ
A prospective client says the page shows no providers, no services, or no times. Open Settings → Online Booking — the Can new clients book you online? card at the top checks every switch for you and links to the one that's off. The chain it checks, in order: the practice-wide Accept Requests from New Clients switch; the clinician's Accepting New Clients? switch on the Widgets page; the clinician's own Accept Online Booking Requests switch and weekly availability; and remember the earliest offered day is tomorrow.
The page says "No services are currently available for online booking." The public page only offers services that are open to new clients. Go to Settings → Billing → Fee Schedule, edit the service you want offered (a free initial consultation is a common choice), and turn on both Available for online appointment requests and Allow for new clients. New practices start with none switched on, so this is a normal first-time step; the readiness card on the Online Booking page flags it.
Can someone book onto my calendar without my approval? No — new-client requests wait in the review list until you accept, and existing-client requests arrive as proposed appointments.
Someone says they submitted the new-client form, but no request arrived. If the email they used already belongs to a client of your practice, no request is created — that address gets an email asking them to sign in to the client portal and request an appointment from there.
Will the public page get spam or abuse? Submissions are protected server-side — human verification plus per-person and per-practice daily limits — so review-list junk is rare.
Can I change how the button looks? Yes — see customizing the widget.